Results 1 to 10 of 586

Thread: NSX Health Check Service

Hybrid View

Previous Post Previous Post   Next Post Next Post
  1. #1
    Join Date
    Sep 2008
    Location
    Bucks, UK
    Posts
    2,235
    Blog Entries
    2685

    Default Main Relay

    6. Main Relay
    The famous Main Relay.
    Have you already replaced yours?

    This NSX is the early model so it is located towards the centre side of the chassis whereas on the later model, it will be close to the right side chassis panel.
    Click image for larger version. 

Name:	EarlyMainRelay.JPG 
Views:	326 
Size:	171.0 KB 
ID:	6286 Click image for larger version. 

Name:	OldAndNew.JPG 
Views:	318 
Size:	154.9 KB 
ID:	6287
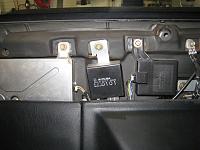
    As always, re-soldered the old one and asked the owner to keep it as an emergency spare.


    7. Coolant System
    This NSX is NA1 AT model so it will require extra hoses for the ATF cooler. In total, there are 25 hoses to be replaced with 49 clamps. The number of hoses and parts no are different for NA1/NA2, MT/AT and so on so be careful.

    It took about 15min to warm up the engine so I was quite sure the Thermostat was stuck open. And this is the difference between the old and new one. The one on the left is the original one with stuck open valvle.
    Click image for larger version. 

Name:	OldNewThermoStuckOpen.JPG 
Views:	320 
Size:	155.0 KB 
ID:	6288

    And the Header Tank.
    Click image for larger version. 

Name:	OldNewHeaderTank.JPG 
Views:	319 
Size:	152.8 KB 
ID:	6289
    If yours looks like the one on the right, it's time to replace it. I prefer using the OEM one although it tends to crack at the middle or at the base of the cap after several years. The internal design of the tank can't be ignored.

    Same for the Coolant fluid. I prefer using Honda Type-2 Blue one. It has been developed by the Honda R&D and it just lasts so long that you'll probably have to replace the hoses before replacing the coolant next time.
    Click image for larger version. 

Name:	Type2.jpg 
Views:	317 
Size:	39.3 KB 
ID:	6290
    Last edited by Kaz-kzukNA1; 18-10-2009 at 09:40 PM. Reason: Missed attachments

  2. #2
    Join Date
    Sep 2008
    Location
    Bucks, UK
    Posts
    2,235
    Blog Entries
    2685

    Default

    These are the parts replaced.
    Click image for larger version. 

Name:	23+2AThoses.jpg 
Views:	295 
Size:	63.3 KB 
ID:	6291

    The ones in the Engine Room, at the Centre floor and at the Front under bonnet.
    Click image for larger version. 

Name:	EngineRoom.jpg 
Views:	283 
Size:	66.6 KB 
ID:	6294 Click image for larger version. 

Name:	Centre.jpg 
Views:	285 
Size:	69.7 KB 
ID:	6292 Click image for larger version. 

Name:	FrontCompartment.jpg 
Views:	296 
Size:	61.9 KB 
ID:	6295

    The ones at the Engine Oil Cooler with Figure of ' 8 ' O-ring.
    Click image for larger version. 

Name:	EngineOilCooler.jpg 
Views:	289 
Size:	65.5 KB 
ID:	6293
    Even after carrying out the same service for many times, it still takes 1 - 2Hr just for these 2 hoses.... Seriously...
    I'm glad that we replaced all the hoses especially these two. Previously, this NSX had driveshaft grease leakage and lots of grese were covering this short hose. Because of this and with the heat from header, it was already expanded/de-formed and about to burst.

  3. #3
    Join Date
    Sep 2008
    Location
    Bucks, UK
    Posts
    2,235
    Blog Entries
    2685

    Default

    As always, vacuum filled and leak tested the entire system.
    Click image for larger version. 

Name:	VacuumTest.JPG 
Views:	280 
Size:	152.9 KB 
ID:	6298 Click image for larger version. 

Name:	VacuumLeakCheck.JPG 
Views:	294 
Size:	167.6 KB 
ID:	6297 Click image for larger version. 

Name:	VacuumFill02.JPG 
Views:	270 
Size:	151.7 KB 
ID:	6296

    Now the coolant system warms up properly and all the hoses will be fine for many years.


    8. A/C Evaporator
    As in my old post, our NSX doesn't have any pollen filter. So, anything managed (it's quite easy to do so) to get inside the blower fan motor unit, it will be directed to the surface fin of A/C evaporator unit.
    And if you haven't washed it for many years, it will look like this....
    Click image for larger version. 

Name:	BeforeAirConEvapo.JPG 
Views:	284 
Size:	178.0 KB 
ID:	6299 Click image for larger version. 

Name:	CloseUpAirConEvapo.JPG 
Views:	299 
Size:	150.2 KB 
ID:	6300
    I'm afraid this is what you are breathing while you are inside the cabin....

  4. #4
    Join Date
    Sep 2008
    Location
    Bucks, UK
    Posts
    2,235
    Blog Entries
    2685

    Default

    So, once a year, take off your blower motor unit and wash it gently with special chemical designed for aluminium. Be careful with the aluminium surface fin as they are so fragile. I always use soft brush for cleaning.

    At the same time, consider making a simple DIY filter at the inlet of blower motor fan. Be careful not to reduce too much air entering the unit to avoid any damages as well as pay extra attention to prevent the filter from absorbing any water in contact.
    Now, the evaporator is in much better condition and the uncomfortable smell is gone.
    Click image for larger version. 

Name:	AfterAirConEvapo.JPG 
Views:	312 
Size:	178.2 KB 
ID:	6302 Click image for larger version. 

Name:	DIYcabinFilter.JPG 
Views:	289 
Size:	187.3 KB 
ID:	6301


    9. Rear Fog Light Circuit
    As mentioned, this NSX is JDM so it has different tail light arrangement compared to UK model and JDM doesn't have factory fitted Rear Fog Light.

    Because of this, you need to somehow install the Rear Fog Light.
    Unfortunately, the people worked on this NSX carried out not great job and used one of the brake light on each Left and Right Tail lights.
    Click image for larger version. 

Name:	CowboyJob.JPG 
Views:	304 
Size:	221.4 KB 
ID:	6303
    Obviously, this will trigger the 'BRKAE LAMP' warning indicator on the dash and they used black tape to hide it... What a great work....

    I was so scared to see the modification on the wiring so first put them back as much as possible to the OEM level and then created the new circuit for the Rear Fog Light.

    The OEM Switch and the Connector from my precious spare.
    And finally, removed the dirty black tape hiding the warning light.
    Click image for larger version. 

Name:	OEMswitchAndConnector.JPG 
Views:	294 
Size:	210.8 KB 
ID:	6304 Click image for larger version. 

Name:	RemovingTheBlackTape.JPG 
Views:	317 
Size:	153.3 KB 
ID:	6305

    Now there is no more warning light and the owner will be happy to know that the wiring is back to how it should be.


    Took long days to work on this NSX but I'm happy with the result.


    Another NSX restored and tailored to the owner's demand.
    Happy driving


    Kaz

  5. #5
    Join Date
    Dec 2007
    Location
    Switzerland
    Posts
    1,006

    Default

    I can't see those two o-rings for the radiator in your pics. Those are very critical as if the NSX looses pressure in the coolant system then it's at those two, even without having a leak.

  6. #6
    Join Date
    Sep 2008
    Location
    Bucks, UK
    Posts
    2,235
    Blog Entries
    2685

    Default

    Quote Originally Posted by goldnsx View Post
    I can't see those two o-rings for the radiator in your pics. Those are very critical as if the NSX looses pressure in the coolant system then it's at those two, even without having a leak.
    Hi, goldnsx.

    If you look at the plastic tray just below the header tank in the photo of post #112, they are in there.

    Also, sometimes, I don't have time to take photo of all the parts so you may find something missing but it is covered in my Service Log document that will be handed to the owner with the photo CD so I hope the owner is happy with them.

    Thank you for sharing your advice any way as it will help others which is the aim of my post.

    Kaz

Posting Permissions

  • You may not post new threads
  • You may not post replies
  • You may not post attachments
  • You may not edit your posts
  •