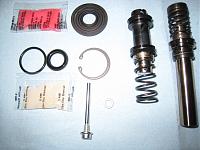
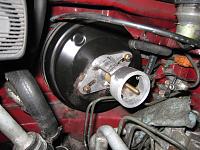
Last edited by NSXGB; 07-09-2009 at 12:32 PM.
Hi Kaz, interesting to see the wear/rust on Paul's caliper pistons. I was going to undertake a rebuild of my calipers over the winter and suspect that I'll find similar damage to the pistons on my car.
A couple of questions if I may...
What does the caliper overhaul kit you mention contain? Do you have a part number to hand?
What other parts should I order?
How many pistons did you replace?
How much, roughly, are they each?
Thanks
Mark

What are the part no. for this?

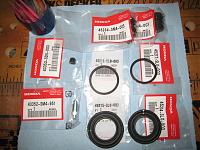
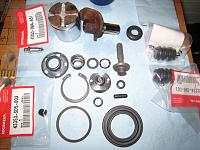
You can buy the calliper seal kit from Honda. The seal kits are NO:1 in both pics.
But after that you can basically buy all the other bits too, pistons, bolts, retainers and so on.
Front callipers break down
Rear Callipers

“Once you eliminate the impossible, whatever remains, no matter how improbable, must be the truth.”
後は、残っているものに関係なく、不可能なことを排除する方法 ありそうもない、真実でなければなりません。
Thanks Sudesh. Mine's a 3.2 so I'll need the specific p/n's for the kits etc.
I'll do the fronts first so, might need a 12 & 15 (piston) for each side. Maybe new bolts as the calipers have been on and off a few times. The slider pins are good 'cos I checked and lubed them up at the last pad change (for the Silverstone track evening) just a month or so a go.
I must get myself one of these parts CD's
Actually there's probably no point in getting the part numbers as the muppets at UK Honda dealer parts desks seem to be incapable of suppling anything without a chassis number.
Cheers
Mark

Hi Mark,
No problem at all. The parts pic I used will vary with the numbers, I used it just to indicate the calliper build. I have JDM parts system, UK and US. Some dealers can be picky with the chassis number issue, but with the correct part numbers I have never had a problem going to the dealer. Also alot of the part numbers on the parts CD systems have been superseded, so its always worth checking with the dealer. There will also be a difference in NA1 and NA2 builds.
Personally Mark, if doing a full rebuild I would replace everything, pistons, bolts, seal, retainers, and so forth.
“Once you eliminate the impossible, whatever remains, no matter how improbable, must be the truth.”
後は、残っているものに関係なく、不可能なことを排除する方法 ありそうもない、真実でなければなりません。
Hi, Mark.
If you look at the 4th photo of the post #67, you'll see the part no and the parts included in the Front OH kit for later spec Front Calliper.
It's 01463-SL0-J01.
You need two of these for the Front.
For those who are interested, please note that the later models has different Front calliper piston size compared to the earlier ones and thus, requries differnt OH kit.
Some of the NA1 (3.0L) engine models were also equipped with this later spec callipers so please be carefiul if you are trying to distinguish the brake calliper spec by the engine size.
Also, if it is a used car, your previous owner may have upgraded the calliper to the later spec. It is quite common and for example, my NSX is 94 model but I'm running the 02 Type-R callipers.
You don't need to replace the pistons and other parts such as the bolt unless they are damaged. You can only judge it by opening the calliper.
For your referece, followings are some of the prices in UK.
HUK price for LATER spec Front calliper
Front OH kit: 80.89 inc.VAT x 2 = 161.78
Front Piston 34mm: 38.16 inc.VAT x 2 = 76.32
Front Piston 40mm: 63.94 inc.VAT x 2 = 127.88
Addition to these, I normally replace the following for the front calliper service. Parts no and image included in the same photo of post #67.
Bleeder screw: 4.67 inc.VAT x 2 = 9.34
Cap, bleeder screw: 2.70 inc. VAT x 2 = 5.40
So, if you go down the route of HUK, you'll be looking at at least 380.00 just for some of the Front Calliper Parts...
As I always service my calliper every 2 -3 years, I don't want to pay this figure so I always order them from Japan or US.
Hope this will help.
Regards,
Kaz
Recently, I was working on another NSX for Brake Calliper OH, Master Cyl OH, Driveshaft service and so on.
The owner bought the NSX as a used car and there were several previous owners in the past.
Initially, the owner brought the car for my Health check and there were many items to be serviced so we discussed the plan based on the available time and the budget.
1. Brake Calliper
The owner had the new brake pads installed at a certain garage and also he was under the impression that the callipers were serviced in the past by the previous owners.
However, at the time of my NSX Health Check Service, I drove this car and the brake performance was nowhere near to the original spec. It was also causing lots of judder when the brake temperature was high. The Brake Master Cyl looked terrible but I’ll touch on this later.
It was agreed to carry out the brake calliper and master cyl OH, replace the brake disks, replace the brake hoses and paint the callipers in matt black.
As soon as I started the service, I found the 1st issue.
One of the boot was damaged when someone carried out the calliper OH or when re-installing the callipers after the new pads were installed. It was not just one side but on both R & L Front Callipers so it was a human error. Also, found that the orientation of the slider pins was wrong, the torque for the rear calliper bracket was too low which was really dangerous and so many other issues.
I’m glad we carried out this OH service as the owner was planning to take this NSX on Nurburgring in near future.
All of the pistons looked very healthy as they were replaced recently but not sure whether it was serviced by someone who knows the specific knowhow for the NSX or not after finding so many issues.
It’s a standard calliper similar to other production cars but requires some knowhow.
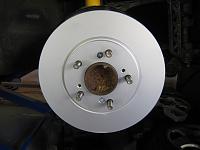
The Front and Rear Calliper OH parts. The new Front Disk by Dixcel. Thanks to Andy at Vtecdirect. We placed the order long time ago while he was offering special deal on all products as well as the NSXCB member's deal.
The Goodridge Brake Hose kit. Considering the UK road environment during the winter, I went for the Stainless fitting and not the Zinc plated one. May be over-spec but additional peace of mind... It took about 2 - 3 wks for the delivery as it was not stocked at the manufacture. It came with lifetime gurantee as well.
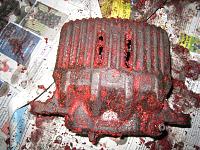
When the owner bought this NSX, the calliper was pianted in red. Well, sort of...
It was already peeling off and looked very tired. The owner didn't like the red and wanted to have the same style as mine which is matt black (02 Type-R). So, stripped the red paint off and painted in matt black using the engine head cover paint. Now it looks really cool for both front and the rear.
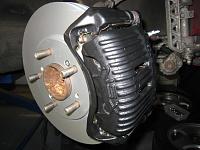
By the way, the rear disk is the OEM one. For the earlier model, you can save a lot by selecting the OEM one compared to the aftermarket ones.
2. ABS re-visited and the Brake master Cyl OH
As in my previous post, I think there are lots of NSX with partially failed solenoid on ABS system without being noticed by the owner. This NSX was one of them and initially, it was not possible to recover one of its solenoid. It was electrically fine but mechanically, it was just stuck closed. Under this condition, there will be no warning light on the dash.
I wanted to try the same trick again and this time, I managed to recover the functionalities.
Once again, the Brake Master Cyl was not serviced for a long time.... There were so many rust at the Booster cover as well as at the base of the Master Cyl. I nearly picked up the phone to call the owner for the permission to replace them altogether.
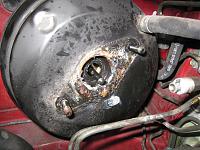
However, after initial cleaning, it was possible to recover them so cleaned them really well and refurbished it using the OH kit.
Then, as I didn't know the history of this NSX, checked the gap of the booster pushrod to be 100% sure about the gap requirement. Now the brake master cyl is back to its original performance.
