Results 1 to 10 of 586

Thread: NSX Health Check Service

Hybrid View

Previous Post Previous Post   Next Post Next Post
  1. #1
    Join Date
    Sep 2008
    Location
    Bucks, UK
    Posts
    2,235
    Blog Entries
    2685

    Default

    Click image for larger version. 

Name:	Cleaning02.JPG 
Views:	291 
Size:	186.0 KB 
ID:	6252 Click image for larger version. 

Name:	Cleaning03.JPG 
Views:	297 
Size:	176.0 KB 
ID:	6253 Click image for larger version. 

Name:	Filter02.JPG 
Views:	363 
Size:	167.5 KB 
ID:	6257
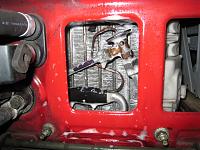
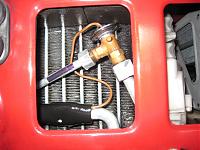
    Just quick clean on the evaporator and made another filter.

    Click image for larger version. 

Name:	Filter03.JPG 
Views:	328 
Size:	178.3 KB 
ID:	6256 Click image for larger version. 

Name:	Clip.JPG 
Views:	286 
Size:	141.3 KB 
ID:	6254
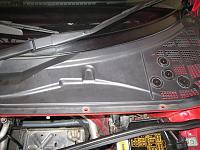
    The filer goes under the plastic panel below the wiper arm under the bonnet.
    If you are going to carry out this process, it would be best to get hold of some of the spare plastic clips holding the rubber weatherstrip under the bonnet as it is so easy to break them after long years.

    8. Driver seat slide motor
    I started to notice that when it was very cold in the morning, the fore/aft sliding motor/gear of driver seat made strange noise. It sounded like struggling to slide. When it’s warm, no problem at all. So, removed the driver seat and took it outside of the cabin. Re-greased the spiral guide and the seat rail and the noise disappeared.


    I was also working on another NSX recently so I'll post the detail soon.

    Kaz

  2. #2
    Join Date
    Apr 2004
    Location
    West Sussex
    Posts
    4,538

    Default

    Kaz,
    What do you recommend for cleaning the TB? Something like this: http://www.toolstation.com/shop/Auto.../sd2795/p30713

    Is it just a case of spraying it down the TB when the engine is running or spraying the TB with engine off and cleaning what you can with a rag, then a good dose while the engine is running?

  3. #3

    Default

    Kaz, is this the 1st or 2nd crank pulley that you've changed on your car?

    The one that you changed for a member here, what age and mileage of the car? I think from previous discussions the crank pulley is not on the servicing schedule? Is this best being done the same time as the timing belt?
    1999 3.2 Manual 6 Spd Coupe
    Honda's Finest Hour

  4. #4
    Join Date
    Sep 2008
    Location
    Bucks, UK
    Posts
    2,235
    Blog Entries
    2685

    Default

    Quote Originally Posted by TheSebringOne View Post
    Kaz, is this the 1st or 2nd crank pulley that you've changed on your car?

    The one that you changed for a member here, what age and mileage of the car? I think from previous discussions the crank pulley is not on the servicing schedule? Is this best being done the same time as the timing belt?
    Hi, TheSebringOne.

    This is the 3rd pulley for my NSX although it will be my 2nd Timing belt service next time.

    I don’t know the exact mileage/age when the balancer split off on the member’s NSX because he/she already spotted the issue before arriving at my place.
    The service was carried out as an emergency case and the owner applied short term fix before arriving at my place. However, I do know that his/her NSX was used on the track many times.

    While the mileage and age will play some factor for this issue, the biggest factor would be the driving condition such as the sudden change in RPM and the heat. So, for some owners, the pulley will be fine for more than 10 years whereas for some of us, it will fail earlier than that.

    You will be surprised to know how heavy the balancer is and it is only held in place by the rubber.
    So, inevitably, if you make sudden change in rpm, it will snap off after many years. You can’t judge it just by the mileage or the age. Also, you can't see it from outside as the balncer is hidden by the pulley.

    Although it is not defined as regular service item, it is a common practice to replace this at least at the time of timing belt service among the people who works on NSX regularly in Japan.

    For those who track their NSX or drive aggressively, it is best to replace it more frequently.

    Regards,
    Kaz

  5. #5

    Default

    Thanks Kaz, just to confirm that the job to change the crank pulley is alot easier when you are also changing the TB at the same time? Thanks
    1999 3.2 Manual 6 Spd Coupe
    Honda's Finest Hour

  6. #6
    Join Date
    Sep 2008
    Location
    Bucks, UK
    Posts
    2,235
    Blog Entries
    2685

    Default

    Timing Belt (TB) is located inside the black plastic cover and the Crank Pulley (CP) is outside of this cover.

    So, you can replace the CP any time you want without disturbing the TB.
    No need to be at the same time.
    TB service will require lots of preparation/procedures even before being able to access the TB itself so replacing only the CP is much easier.

    You'll need to remove the CP again at the time of TB service but I would be happy to do so knowing that the CP Bolt would come off with ease as it was cleaned/greased properly and more importantly, I don't need to worry about the CP issue.

    Kaz

  7. #7
    Join Date
    Sep 2008
    Location
    Bucks, UK
    Posts
    2,235
    Blog Entries
    2685

    Default Abs

    Once again, it’s time to work on the Brake, Coolant system and so on.

    This NSX was imported from Japan and there were lots of service record in Japanese so I translated them into English. This document helped a lot on understanding what was done while the car was in Japan.

    During the Health Check Test Driving session, it was pointed out to the owner that the brake was nowhere near to the standard of NSX.
    So, back to my place and serviced them.

    1. ABS
    Although the fluid inside the reservoir was replaced in the past, there was no history of flushing the system and activating each solenoid. By the way, you can activate the ABS by locking the wheels under braking in a safe open space to keep it healthy but it is almost impossible to detect the sticky solenoid (closed) failure by this method. Also, you won’t be able to replace the fluid in the solenoid chamber without flushing one solenoid at a time and replacing the fluid after each flush.

    So, out comes the ABS T-wrench and this was what inside….
    Click image for larger version. 

Name:	AbsTwrench.JPG 
Views:	333 
Size:	161.6 KB 
ID:	6259 Click image for larger version. 

Name:	AbsSoMuchAir.JPG 
Views:	336 
Size:	98.9 KB 
ID:	6258
    So much air in the accumulator.
    Flushed it twice before moving onto the solenoid flush.

    In the process of flushing each solenoid.
    Click image for larger version. 

Name:	SolenoidFlush.JPG 
Views:	331 
Size:	127.5 KB 
ID:	6260
    Luckily, all four solenoids were electrically and mechanically operating fine with no stick. As I don’t want to suck back the air and potential dirt into the flushed accumulator in the first step, I normally replace the entire reservoir fluid after each solenoid flush. As there are four solenoids, you will be repeating this four times.

    After all four solenoids were flushed, I’ll flush the accumulator two more times to complete the service. By this time, the fluid flushed into the T-wrench would be clean and clear from any air apart from the small amount left inside the shaft of T-wrench and the tiny ones through the thread of bleeder plug.

  8. #8
    Join Date
    Sep 2008
    Location
    Bucks, UK
    Posts
    2,235
    Blog Entries
    2685

    Default

    Quote Originally Posted by NSXGB View Post
    Kaz,
    What do you recommend for cleaning the TB? Something like this: http://www.toolstation.com/shop/Auto.../sd2795/p30713

    Is it just a case of spraying it down the TB when the engine is running or spraying the TB with engine off and cleaning what you can with a rag, then a good dose while the engine is running?
    Hi, NSXGB.

    Carburettor cleaner or similar products designed for cleaning intake manifold would be the safest thing to use.

    Please read the instruction on the side of the can as some products will state to be used only when the engine is cold.
    Never use brake cleaner for this purpose as it could trigger fire or even release lethal chemical in the air.

    Be gentle on the TB and never apply any force. While the engine is off, open the TB and gently wipe off any dirt from the front/back surface of the TB. At the same time, spray small amount of cleaner into the intake channel and wipe off any black residue. Don’t spray too much otherwise you’ll struggle to start up the engine at the next step.

    Start the engine and remove the PCV valve from the head cover. Spray the cleaner at the PCV valve in short burst several times.

    For non-DBW model, the TB is closed at the idle rpm and the air is fed through the bypass port which is at the upper side of the TH body. Open the TB slightly to keep the rpm higher than the idle and spray the cleaner in short burst mode aiming at the bypass port.

    Stop the engine and remove the clock fuse to reset the ECU.
    Go out for a short driving to let the ECU to learn the new study value.

    After this process, you may need to adjust the idle rpm so be prepared.
    If you don’t know the procedure or don’t have the rpm monitor, it is best to let someone else to do the job for you.

    Regards,
    Kaz

Posting Permissions

  • You may not post new threads
  • You may not post replies
  • You may not post attachments
  • You may not edit your posts
  •