


Thanks Kaz, just to confirm that the job to change the crank pulley is alot easier when you are also changing the TB at the same time? Thanks


 Platinum Member

Thanks Kaz, just to confirm that the job to change the crank pulley is alot easier when you are also changing the TB at the same time? Thanks
1999 3.2 Manual 6 Spd Coupe
Honda's Finest Hour
 Platinum Member
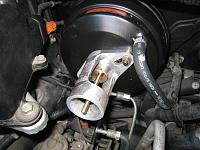
Timing Belt (TB) is located inside the black plastic cover and the Crank Pulley (CP) is outside of this cover.
So, you can replace the CP any time you want without disturbing the TB.
No need to be at the same time.
TB service will require lots of preparation/procedures even before being able to access the TB itself so replacing only the CP is much easier.
You'll need to remove the CP again at the time of TB service but I would be happy to do so knowing that the CP Bolt would come off with ease as it was cleaned/greased properly and more importantly, I don't need to worry about the CP issue.
Kaz
Platinum Member
Once again, its time to work on the Brake, Coolant system and so on.
This NSX was imported from Japan and there were lots of service record in Japanese so I translated them into English. This document helped a lot on understanding what was done while the car was in Japan.
During the Health Check Test Driving session, it was pointed out to the owner that the brake was nowhere near to the standard of NSX.
So, back to my place and serviced them.
1. ABS
Although the fluid inside the reservoir was replaced in the past, there was no history of flushing the system and activating each solenoid. By the way, you can activate the ABS by locking the wheels under braking in a safe open space to keep it healthy but it is almost impossible to detect the sticky solenoid (closed) failure by this method. Also, you wont be able to replace the fluid in the solenoid chamber without flushing one solenoid at a time and replacing the fluid after each flush.
So, out comes the ABS T-wrench and this was what inside .
So much air in the accumulator.
Flushed it twice before moving onto the solenoid flush.
In the process of flushing each solenoid.
Luckily, all four solenoids were electrically and mechanically operating fine with no stick. As I dont want to suck back the air and potential dirt into the flushed accumulator in the first step, I normally replace the entire reservoir fluid after each solenoid flush. As there are four solenoids, you will be repeating this four times.
After all four solenoids were flushed, Ill flush the accumulator two more times to complete the service. By this time, the fluid flushed into the T-wrench would be clean and clear from any air apart from the small amount left inside the shaft of T-wrench and the tiny ones through the thread of bleeder plug.
Platinum Member
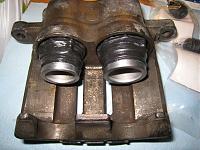
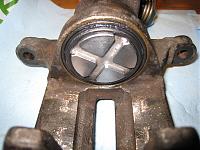
2. Brake Calliper
Quite often, I was asked why we need to service the calliper when there is no leak or even the pedal feels fine.
Well, first of all, you dont want to wait until you find the leakage. You can stop the car with engine failure but it will be a different story for a brake failure.
Even if the seal at the piston was fine, any rust on the piston will allow the small leakage and quite often, you wont notice it unless you overhaul the calliper as you cant see the rust from outside and the initial leakage would be trapped by the dust boot.
Rust can cause piston to seize and as our Front calliper has dual pistons, you wont be able to tell the difference from the pedal feeling unless you know the original stopping power of our NSX from Day1.
So, started the overhaul and found this .
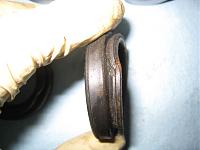
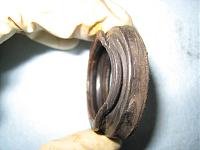
Unfortunately, the person worked on this NSX didnt check the installation of the dust boots.
On both Front Left and Right, the dust boots were not installed properly causing the rust on the piston sleeve.
There was no leakage but enough damage was done and the pistons didnt slide smoothly. As the rust was so deep into the pistons, I had to replace them.
Also, the rust managed to get to the thread of bleeder plug so I normally just replace them as a standard procdedure.
Platinum Member
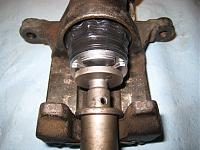
There are several ways to install the dust boots but the key thing is to double check it.
First, install the dust boot and then feel it all the way round with your finger that the boot is sitting firmly inside the groove of calliper.
Then, install the pistons and push them all the way in.
Now, to double check the installation, push out the pistons carefully to see the seating of boot and then push them back in again.
Platinum Member
Similar story for the Rear but rotate it instead of pushing in.
Platinum Member
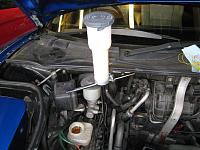
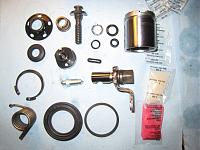
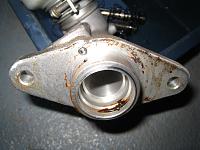
3. Brake Master Cyl
Once again, its time to work on the master cyl.
As mentioned in the past, there is no English manual on how to overhaul (OH) this.
Here is the small leakage already seen at the Brake Master Cyl without being noticed by the owner and the OH kit.
As always, there is no gurantee that the pushrod gap was never touched so it is important to double check it using the SST.
 Posting Permissions

 Reply With Quote