Results 1 to 10 of 586

Thread: NSX Health Check Service

Hybrid View

Previous Post Previous Post   Next Post Next Post
  1. #1
    Join Date
    Sep 2008
    Location
    Bucks, UK
    Posts
    2,235
    Blog Entries
    2685

    Default

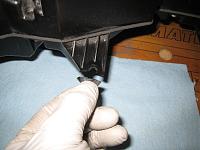
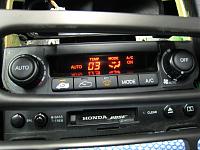
    CCU test mode. Repairing the plastic screw tab.
    Click image for larger version. 

Name:	CCUtestMode.JPG 
Views:	477 
Size:	147.1 KB 
ID:	5571 Click image for larger version. 

Name:	SpeakerHousingRepaired01.JPG 
Views:	484 
Size:	135.2 KB 
ID:	5572 Click image for larger version. 

Name:	SpeakerHousingRepaired02.JPG 
Views:	520 
Size:	133.4 KB 
ID:	5573
    The CCU has built-in test mode to enable us checking its functionalities. This photo shows that it’s in test mode #3. I’ll check the CCU step by step to confirm the air temperature, fan speed, air flow mode, Air Con on/off and so on.

    Quite often, I noticed that lots of plastic parts were damaged by the people who worked on the owner’s NSX previously. This NSX was the same and had lots of plastic screw tab being cracked. I can repair them using special plastic material to form the exact shape.


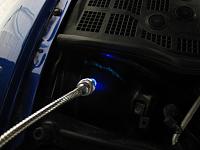
    A/C gas leak check. Oil leak inspection.
    Click image for larger version. 

Name:	UVrayAirConLeakCheck.JPG 
Views:	493 
Size:	104.4 KB 
ID:	5574 Click image for larger version. 

Name:	OilLeakage03.JPG 
Views:	498 
Size:	199.6 KB 
ID:	5575
    If your Air Con gas was filled with special green colour dye, we can detect the leakage by applying the UV ray light. There are several common leakage points on our NSX. Better to sort it out now before the hot summer arrives...

    Speaking of leakage… Unfortunately, our engine tends to leak the engine oil from several places.
    Spool valve, oil pan, cam seals, head cover, etc…
    It is important to know the state of the leakage and it would be best to deal with these common leakage points at the time of timing belt change or major service. Then, you can relax for many years.

  2. #2
    Join Date
    Sep 2008
    Location
    Bucks, UK
    Posts
    2,235
    Blog Entries
    2685

    Default

    Door striker adjust. Boot lid striker adjust. Window screen upper seal.
    Click image for larger version. 

Name:	AdjustedPassStriker.JPG 
Views:	480 
Size:	139.5 KB 
ID:	5576 Click image for larger version. 

Name:	AdjustedBootLidHeight.JPG 
Views:	508 
Size:	146.3 KB 
ID:	5577 Click image for larger version. 

Name:	UpperSealShrunk02.JPG 
Views:	503 
Size:	136.3 KB 
ID:	5578
    All of our NSX were specially assembled by the special Honda craftsmen. Therefore, I can’t stand watching the un-even gap on the bonnet, door, retractable headlight cover, fuel filler door, boot lid, etc… Adjusted the door and boot lid on this NSX.
    Also, I will check the feeling of the door handle/opening lever as lots of NSX requires greasing on the internal linkage.

    The upper seal… Another common failure on our NSX especially if you park the car under the strong direct sun light for many days.
    Although the parts are quite cheap, it takes ages to clean up the debris after removing the seals. I will be working on this NSX very soon….


    Boot dampness check. Eng/AT/MT mount check.
    Click image for larger version. 

Name:	BootCleaned01.JPG 
Views:	473 
Size:	184.5 KB 
ID:	5579 Click image for larger version. 

Name:	LotsOfHairLineCrackEngMount.JPG 
Views:	508 
Size:	138.4 KB 
ID:	5580
    Over the years, your boot weatherstrip will get tired allowing moisture to get inside. Also, if you place any wet items inside the boot, it will also cause lots of humidity inside the boot. As a side effect, it may cause moisture inside the tail light unit depending on the state of your light housing and the seals. Best to remove the carpet, dry it under the sun and clean the boot.

    Most of the rubber parts will be damaged due to the ageing. Because of the engine/trans layout, the mount at the Front and Rear will get the most of the rotational force. The ones on the side will also go through all sorts of force/frequency. You will find lots of hairline crack on these mounts and sometimes, the rubber part can split. Please don’t confuse yourself with the big gap and the rubber split. In order to tune the hardness and the frequency of the mount, there is a big gap on the mount from the beginning.


    There are more than 150 points to check during my Health Check service so I can’t cover all of them here but I hope my service will help you in keeping your NSX in top condition.

    In the future, I’ll be taking out my engine again to take lots of photos to introduce my new 'Refresh menu' for the engine .

    Regards,
    Kaz

  3. Default

    Kaz,

    It really is a pleasure to read about your passion and commitment to the NSX.

    I'll be in touch to arrange a health check asap.

    When you take the engine out to service it would there be any scope for enhancement or increased displacement? I know SOS in America offer this service but I've got no idea what's involved. If you were able to offer some sort of service like this then I would be more than interested and happy to be a gunnea pig! I'm due a cambelt service next year... maybe this would be a good time to perform the engine check and also any performance enhancements?

    If this is viable then maybe a new thread is in order...

    Many thanks,

    Luke
    1998S 3.2 red/black manual 4 years of great memories
    2004 54 red/red manual

    ---------------------------------------------------
    Quote autocar Nov 2005

    "Before the NSX supercars were crap"
Posting Permissions

  • You may not post new threads
  • You may not post replies
  • You may not post attachments
  • You may not edit your posts
  •