Page 1 of 2 12 LastLast
Results 1 to 10 of 15

Thread: cured the typical screen misting... i hope!

  1. #1
    Join Date
    Sep 2005
    Location
    Garden of England
    Posts
    2,832

    Default cured the typical screen misting... i hope!

    Now we all know misting can be a problem, and after making sure the door membranes were present and correct ages ago, the misting still occurred.. usually after i'd used the air con.

    Now my car has never had the air-con puddle under it, and following on from advice in Kaz's thread i thought i'd look at the heater box... so, as the rad was out, spare support bar was out and battery removed for charging, i delved slightly deeper and took out the heater blower to investigate the cooler matrix...

    Kaz's general advice to clean it was well worth the effort. 17 years of dust, dirt, leaf material and seeds had done a good job of clogging things, not so much the matrix, but more the drain hole under the matrix... the one that lets the condensed water out from the front of the matrix. so the water condensed, drained to the bottom, and sat there nicely in a leaf mulch!!!

    soapy water and a brush soon had the matrix clean, and a bit of careful digging and probing with a rod of solder had the drain clear! fingers crossed!!!

    to prevent it happening again, a filter was required, so following on from here, http://www.nsxprime.com/forums/showt...ht=hepa+filter i ordered a FRAM CA 9115 air filter (less than a tenner delivered off ebay) and set too....

    the offending inlet...


    where the filter fits...


    i decided it didn't need trimming, as it fitted nice and snug as it was...


    all done, just be careful refitting all the screws and the screen lower moulding
    Last edited by britlude; 29-11-2009 at 07:43 PM.
    aka Jonathan!!

    '92 charlotte green auto.... as a daily
    '37 Ford Y street rod......... something for the weekend!

    ...... if a photobucket pic is foggy, click it, and it'll take you to the clear version, yes, it's a clicking faff....

  2. #2

    Default

    How does the screen moulding release please? I'd like to get to the cleaning done but I'm not clear on how to remove the cover .. any advise welcomed.

    Thanx, Paul
    Senninha

    'Too many manufacturers today are obsessed with lap times and power outputs at the expense of emotion and fun' Colin Goodwin

    S2 is signed by the NSX Project Leader Shigeru Uehara

  3. #3
    m666 edd Guest

    Default

    I think I need to do this too at some point. I haven't looked at taking the cover off yet but some tips beforehand would be helpful also.

  4. #4
    Sudesh Guest

    Default

    The trim is held in with lots of plastic clips/screws

    Heres a pic from the parts manual


  5. #5
    Join Date
    Sep 2005
    Location
    Garden of England
    Posts
    2,832

    Default

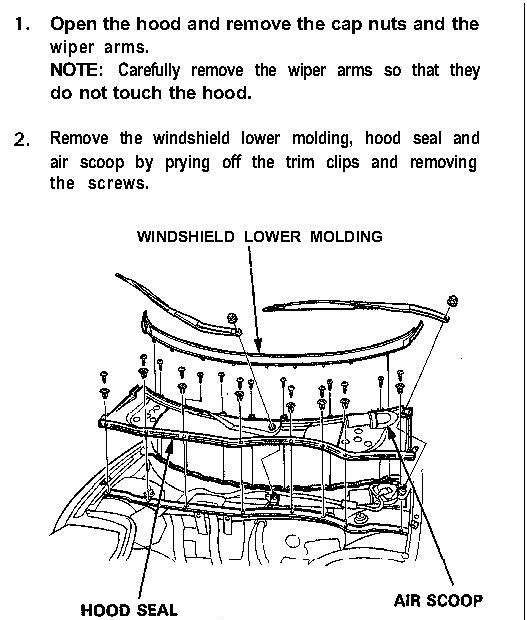
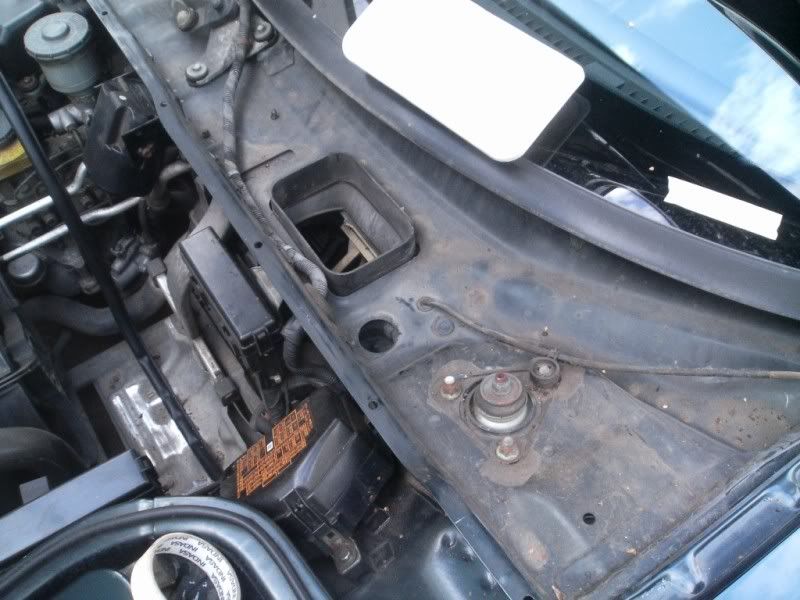
    the lower window trim comes off first, to reveal the screws for the wiper motor cover...

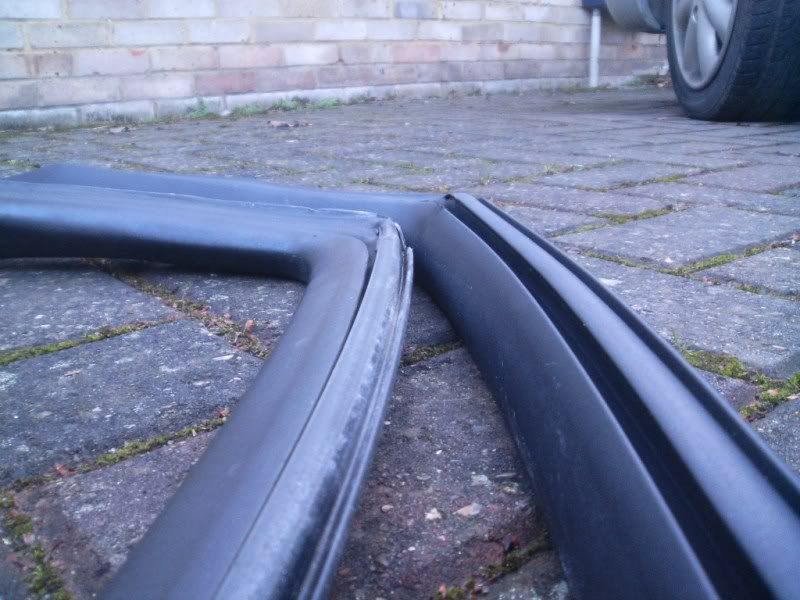
    the window trim is clipped onto plastic clips that look a bit like a figure 8. they are pinned in the middle to the car frame, and the 2 loops top and bottom 'spring' into the window trim 'extrusion'.

    the best way i can think to describe removal is to press the trim down the window glass, and then gently pry up the lower edge..

    hopefully that makes sense just go slow and gentle! you'll work out where the clips are! as soon as you see the first one, you'll know what i mean!!!
    Last edited by britlude; 12-12-2009 at 01:25 PM.
    aka Jonathan!!

    '92 charlotte green auto.... as a daily
    '37 Ford Y street rod......... something for the weekend!

    ...... if a photobucket pic is foggy, click it, and it'll take you to the clear version, yes, it's a clicking faff....

  6. #6
    Join Date
    Apr 2004
    Location
    West Sussex
    Posts
    4,559

    Default

    So, did it cure your misting problem?


    Careful with those push pins, mine were uber brittle...

  7. #7
    Join Date
    Sep 2008
    Location
    Bucks, UK
    Posts
    2,325
    Blog Entries
    2704

    Default

    Hi, all.

    Before start removing anything, I would recommend getting spare ‘push pins’ holding the rubber Weatherstrip and the Air Scoop at the front. As mentioned above, it is so easy to break these pins due to the ageing.

    These photos were from LH drive NSX but would be similar to our RH model.
    Click image for larger version. 

Name:	MoldingAirscoopWeatherstrip.jpg 
Views:	582 
Size:	107.0 KB 
ID:	6411 Click image for larger version. 

Name:	YelloClip.jpg 
Views:	557 
Size:	62.5 KB 
ID:	6412 Click image for larger version. 

Name:	FixingHoles.jpg 
Views:	592 
Size:	80.8 KB 
ID:	6409

    It would be best if you try to clean the area under the Air Scoop WITHOUT removing it by just lifting the front section of it. [Edit: You can do this by removing the push pins hidden under/inside of the weatherstrip.]

    The Air Scoop is held by the push pins at the front and lots of tapping screws at the rear. In order to access these screws, you'll need to remove the Windshield Lower Molding. This Molding is held by lots of yellow clips like the ones in the photo and again, it is so easy to break the tiny lock at the cubic section.
    Even you try the procedure described in post #5 by britlude and kept the yellow clips in place, it is still easy to damage part of the clip due to the ageing.

    You may also struggle to remove the Widshield Lower Molding around the bonnet hinge area if you have never done it before. This may result in bending the molding making it difficult to re-fit.

    Click image for larger version. 

Name:	Drainpipe.jpg 
Views:	349 
Size:	53.9 KB 
ID:	6410
    While removing the blower motor unit, remember to clean the drain pipe like the one in the photo. If you parked your NSX under the tree in the past, you may have lots of debris in there.

    Good Luck.

    Regards,
    Kaz
    Last edited by Kaz-kzukNA1; 13-12-2009 at 01:13 PM. Reason: Added extra instruction.

  8. #8
    Join Date
    Sep 2005
    Location
    Garden of England
    Posts
    2,832

    Default

    Latest update....

    the cleaning out of the aircon has made a difference, the car not fogging up after the system has been on, so success there! what it didn't stop was the fogging up after rain! so i've bit the bullet and got new door window rubbers...


    the old sealing rubbers are so flattened!

    now they are fitted, it's improved again, and i'm another step closer to fogging free!!! the door shuts still get damp/wet so a set of door rubbers will go on soon! well, i've come this far, and the rubbers are 17 years old....
    aka Jonathan!!

    '92 charlotte green auto.... as a daily
    '37 Ford Y street rod......... something for the weekend!

    ...... if a photobucket pic is foggy, click it, and it'll take you to the clear version, yes, it's a clicking faff....

  9. #9
    Join Date
    Sep 2008
    Location
    Bucks, UK
    Posts
    2,325
    Blog Entries
    2704

    Default

    Hi, britlude.

    Just a matter of interest, what is the state of your A/C especially the gas level?

    If your evaporator drain hose is not blocked and considering the relatively small cabin size of our NSX with the OEM ND compressor, it should easily remove the moisture from the cabin air/window even you have wet shoes/cloths/etc inside the cabin.

    Is your A/C compressor really working when the ON signal was sent to the A/C Clutch switch?
    Another thing to look at is the state of your CCU (Climate Control Unit). You may not feel it but if it was never serviced in the past and if your NSX is from 92, I'm almost 100% sure that you have a problem there as well.

    Still, nice to see other owners working on their NSX.
    I want to work on my NSX as well...

    Regards,
    Kaz

  10. #10
    Join Date
    Sep 2005
    Location
    Garden of England
    Posts
    2,832

    Default

    hi Kaz, the aircon appears to work fine, tho opening up the CCU is on the to do list, once my hotrod is back together!

    the original issue was the wet mulch in the bottom of the AC cooler matrix, now that's sorted the flattened rubbers, which need doing anyway, are being replaced with new! the top rubbers have helped, the bottom should cure!
    aka Jonathan!!

    '92 charlotte green auto.... as a daily
    '37 Ford Y street rod......... something for the weekend!

    ...... if a photobucket pic is foggy, click it, and it'll take you to the clear version, yes, it's a clicking faff....

Page 1 of 2 12 LastLast

Posting Permissions

  • You may not post new threads
  • You may not post replies
  • You may not post attachments
  • You may not edit your posts
  •