
Well there you go, looks like this part:
https://www.parts-honda.uk/honda-car...__0300/2/23825
https://www.parts-honda.uk/honda-car...ts/22841PR8010


 Platinum Member

Well there you go, looks like this part:
https://www.parts-honda.uk/honda-car...__0300/2/23825
https://www.parts-honda.uk/honda-car...ts/22841PR8010
1992 NSX, 3.0 Manual, (Was Sebring Silver) Now Kaiser Silver
2018 Jaguar XE, 2.0 R-Sport 250, Loire Blue.
2013 Kawazaki ER6F, Metalic Green.

Originally Posted by mutley

Only £12 from Amayama
Wix
Platinum Member
Absolutely, NEVER go to Honda unless you really have to
1992 NSX, 3.0 Manual, (Was Sebring Silver) Now Kaiser Silver
2018 Jaguar XE, 2.0 R-Sport 250, Loire Blue.
2013 Kawazaki ER6F, Metalic Green.
Most parts arrived this week, although the clutch is still 'out for delivery' according to Parcelforce & started to clean the parts. Took best part of a day to clean the gearbox, there was a lot of baked on dirt/grease, probably 30 years worth...
Need to repair a couple of threads in the gearbox, a couple have more or less been stripped by a prior removal.
Anyone had experience with using helicoils or inserts as DIY ? Not something I've ever used, so be interested in whether it's something to tackle myself or take the gearbox to an engineering company.
Wix
 Platinum Member
Helicoil is good for this purpose and used it at several different section of our NSX.
Addition to the gbox, the mating bolt thread at the suspension control arm, curved/L-shaped holder bracket between the eng/gbox, etc all suffer from oxidation.
When removing the bolt, if you felt something not quite right, just mark it so that you can check and deal with it before re-assembly.
For Eng block, timesert is better but it requires extra meat to be removed during the preparation and the jig/die is quite expensive.
For other places, helicoil, v-coil or the likes are good enough.
Just make sure to check the material of the inserts and the required length for your purpose.
Kaz
Last edited by Kaz-kzukNA1; 18-11-2021 at 03:12 PM. Reason: typo
Thanks Kaz.
The damaged threads are as you say, the one gearbox side of the L-shaped strut bracket & one of the lower fixings on the gearbox main engine mountings. Both low on the car, so more susceptible to corrosion, as little protection to the elements.
Two kits ordered for the different thread sizes M10x1.25mm & M12x1.25mm
Wix
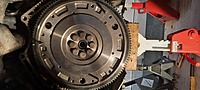
Today I started to re-assemble the clutch. Crank end seal replaced & new flywheel attached. I've had a few dry runs with the clutch assembly, as it's a tad more tricky than a single plate clutch. I've also used the old assembly as reference, to make sure I'm totally familiar with the set-up.
New release bearing guide
clutch fork & pivot. Noticable wear on them
Old release bearing guide, lot of wear. My guess is this was never replaced when the clutch was last replaced. There's an actual ridge where the metal has worn away.
new flywheel on & torqued up.
Wix
dry build.
old plate with the new one
crank oil seal

Wix
Todays adventures.....
start to disassemble the intermediate shaft to replace bearing & seals.
repairing the few stripped threads with helicoils
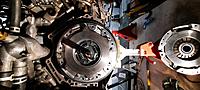
clutch assembly going on.
greasing the release bearing with Honda Urea grease as per Kaz's recommendation
Wix
Platinum Member
4th photo.
That's way too much grease applied.
It could cause issue in the longer term.
What I normally do is to first just apply really thin coat covering the entire internal wall.
Really thin that you can hardly see the actual grease and just oil film on the surface.
Then, 'pack' the narrow groove/channel evenly inside the release bearing where it slides over the release bearing guide.
I can't even see the groove/channel in your photo.....
Keep the grease height/thickness flush/close to the internal wall.
Just before the installation of the trans case, apply really thin coat of grease around the release bearing guide.
As long as you've invested in high quality grease, this should keep the release bearing and the guide healthy until the next CL service.
For some reason, the OEM Urea grease outside of Japan is in a pot and the grease has green colour.
Mine is in big tube and the grease is dark grey.
Kaz
 Posting Permissions

 Reply With Quote