Page 13 of 58 FirstFirst ... 3111213141523 ... LastLast
Results 121 to 130 of 580

Thread: NSX Health Check Service

  1. #121
    Join Date
    Sep 2008
    Location
    Bucks, UK
    Posts
    2,233
    Blog Entries
    2685

    Default

    Hi, all.
    Recently, I was helping one of the new owner here.

    1. ABS
    Once again, it was full of air and had to close the special ABS T-wrench several times before completely releasing the pressure from the accumulator.
    Click image for larger version. 

Name:	AbsSST.JPG 
Views:	257 
Size:	146.7 KB 
ID:	6363 Click image for larger version. 

Name:	FullOfAir.JPG 
Views:	264 
Size:	81.3 KB 
ID:	6364 Click image for larger version. 

Name:	SolenoidFlush.JPG 
Views:	278 
Size:	106.7 KB 
ID:	6365
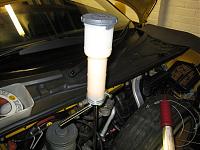
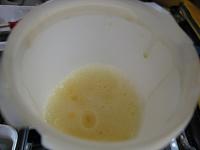
    It is recommended to flush the system every year or at least once in two years time. This also includes the four solenoids flush. Luckily, all four solenoids on this car were working fine and they were flushed without any issues. The reservoir was drained after each solenoid was flushed and after the fourth one was done, the entire system was flushed again for two times. By this time, the fluid released into the ABS T-wrench showed [edit] little air and ready for another year.

    2. Driveshaft
    Another regular maintenance item on our NSX. In order to speed up the process, I’ve re-built my spare right and left driveshafts just before receiving the car. It will include full re-built of pin roller bearing inside the roller assy as well as painting the joint housing.
    Click image for larger version. 

Name:	DRshaftRebuilt02.JPG 
Views:	278 
Size:	108.0 KB 
ID:	6367 Click image for larger version. 

Name:	DRshaftRebuilt03.JPG 
Views:	260 
Size:	126.7 KB 
ID:	6368

    Last edited by Kaz-kzukNA1; 30-11-2009 at 10:36 AM. Reason: missed the text 'little'

  2. #122
    Join Date
    Sep 2008
    Location
    Bucks, UK
    Posts
    2,233
    Blog Entries
    2685

    Default

    The old driveshaft came off from the owner's NSX and the re-built one from my spare. Nicely painted in black as well....
    Click image for larger version. 

Name:	OldAndRebuilt.JPG 
Views:	277 
Size:	212.7 KB 
ID:	6369

    On this NSX, someone worked on the driveshaft previously but decided to use tyrap instead of double loop metal band to secure the boot. No way….
    It couldn’t hold the grease inside the joint and splashed the grease everywhere.
    Click image for larger version. 

Name:	IMG_4120.JPG 
Views:	273 
Size:	171.0 KB 
ID:	6370 Click image for larger version. 

Name:	IMG_4131.JPG 
Views:	281 
Size:	151.9 KB 
ID:	6371

    After lots of cleaning, the re-built driveshaft was installed. While working on the driveshaft, it would look quite scarely when all of the suspension bolts were removed.
    Click image for larger version. 

Name:	IMG_4137.JPG 
Views:	274 
Size:	180.9 KB 
ID:	6372 Click image for larger version. 

Name:	Suspension.JPG 
Views:	284 
Size:	189.6 KB 
ID:	6373

  3. #123
    Join Date
    Sep 2008
    Location
    Bucks, UK
    Posts
    2,233
    Blog Entries
    2685

    Default

    3. MTF
    During the driveshaft service, if you are removing the left side driveshaft, you will need to drain the transmission oil. This NSX was MT so it was also a good idea to remove the MTF strainer to check the state of the transmission.
    Click image for larger version. 

Name:	IMG_4144.JPG 
Views:	261 
Size:	112.2 KB 
ID:	6374
    The strainer cover was corroded severely and took some time to remove. It is so easy to break the tab holding the cover to the transmission case but if the corrosion is too severe, it is quicker to break the tab and replace it with a new one.

    It looked as if the strainer cover was never removed in the past. There were several tiny metal dust/particle inside the strainer but after more than 90,000miles, it was not too bad. Unless you track your NSX regularly, I recommend using Honda MTF-3. Otherwise, you will feel notchy shifting especially in selecting 2nd gear on cold morning.
    Click image for larger version. 

Name:	MTFstrainer.JPG 
Views:	261 
Size:	112.6 KB 
ID:	6375 Click image for larger version. 

Name:	IMG_4184.JPG 
Views:	259 
Size:	128.0 KB 
ID:	6377

    4. Suspension bolts
    In order to remove the driveshaft, you will need to remove the suspension bolts including the alignment bolt. Just mark the camber alignment position and make sure not to mix up left and right.
    Click image for larger version. 

Name:	IMG_4149.JPG 
Views:	264 
Size:	133.3 KB 
ID:	6376
    As our suspension parts are made from aluminium, please do not use cupper grease on them. As you can see, they are marked with green colour from the factory showing that they were specially treated to prevent corrosion due to non-aluminium parts touching the aluminium suspension.
    I normally apply thin coat of silicone grease and for 15 years, my suspension bolts are not corroded and always easy to work with. By the way, for this NSX, it took long time to deal with many bolts as they were corroded. I applied silicone grease for future service.

  4. #124
    Join Date
    Sep 2008
    Location
    Bucks, UK
    Posts
    2,233
    Blog Entries
    2685

    Default

    5. Main Relay
    Another common failure on our NSX. The Main Relay.
    When DBW (drive by wire) was introduced on NSX, the location of main relay was also changed.
    Click image for larger version. 

Name:	IMG_4154.JPG 
Views:	269 
Size:	182.3 KB 
ID:	6378 Click image for larger version. 

Name:	MainRelay01.JPG 
Views:	292 
Size:	131.6 KB 
ID:	6379
    It has different bracket compared to the original one and the part number is also changed.
    Although the number on the case body is different, the internal circuit is exactly the same between the two.
    Re-soldered the original one and wrote some information on the bracket for future reference. It will be replaced with the new one once the parts arrived from Japan.

    6. Brake Fluid
    During the test driving session, it was recommended to the owner to overhaul the brake system such as the master cylinder and callipers. However, the owner wanted to first just replace the brake fluid and then put the car on the brake dyno to test the brake torque before carrying out any brake service. Also, the car passed the MOT just recently.

    Eventually, I couldn’t release the car to the owner for safety reason but I’ll touch on this later.

    The original fluid… Black. It should be clear unless you are using special brake fluid.
    Click image for larger version. 

Name:	IMG_4186.JPG 
Views:	302 
Size:	122.7 KB 
ID:	6380 Click image for larger version. 

Name:	IMG_4188.JPG 
Views:	258 
Size:	155.6 KB 
ID:	6381

  5. #125
    Join Date
    Sep 2008
    Location
    Bucks, UK
    Posts
    2,233
    Blog Entries
    2685

    Default

    7. A/C Climate Control Unit (CCU) and Cabin air temperature sensor
    Regardless of the mileage, your A/C CCU will fail.
    Click image for larger version. 

Name:	IMG_4010.JPG 
Views:	273 
Size:	247.3 KB 
ID:	6382
    The CCU computer board was re-furbished and the Cabin air temperature was cleaned as it was making annoying noise.

    Lots of dust inside the sensor. You can only clean it thoroughly by disassembling it. Now, it is smooth and quiet.
    Click image for larger version. 

Name:	IMG_4197.JPG 
Views:	270 
Size:	109.6 KB 
ID:	6383 Click image for larger version. 

Name:	IMG_4198.JPG 
Views:	267 
Size:	129.5 KB 
ID:	6384 Click image for larger version. 

Name:	IMG_4199.JPG 
Views:	272 
Size:	143.1 KB 
ID:	6385

    Now it is clean....
    Click image for larger version. 

Name:	IMG_4200.JPG 
Views:	273 
Size:	106.5 KB 
ID:	6386

  6. #126
    Join Date
    Sep 2008
    Location
    Bucks, UK
    Posts
    2,233
    Blog Entries
    2685

    Default

    8. Rear Brake Calliper
    During the Health Check, it was recommended to the owner to have full brake system overhaul. Also, the parking brake was not balanced correctly between right and left.
    While tightening the spindle nut to about 330Nm at the end of driveshaft service, I noticed that the rear brake was nowhere near to the perfect condition. The Parking brake between left and right had massive offset and the right side calliper felt as if it was seized. I don't know how it manged to pass MOT recently...

    So, picked up the phone and told the owner that although we didn’t agree about the calliper overhaul, I would not release the car because of the safety reason.
    The owner kindly agreed to let me carry out the overhaul and these were what I found…

    The piston dust boot had cut in one place and not installed properly. The parking brake cable pin was completely rusted and I couldn't even remove it before soaking it with penetrating oil overnight. This was also the cause of the un-balance of parking brake between Right and Left. The lower calliper slider pin was corroded and completely seized. I had to actually hammer it out...
    Click image for larger version. 

Name:	IMG_4203.JPG 
Views:	263 
Size:	110.8 KB 
ID:	6387 Click image for larger version. 

Name:	IMG_4206.JPG 
Views:	271 
Size:	199.0 KB 
ID:	6388 Click image for larger version. 

Name:	IMG_4204.JPG 
Views:	278 
Size:	136.6 KB 
ID:	6389

    And because of these issues, the piston was heavily rusted and the rust even got inside of the calliper body. Had to clean it for a long time...
    Click image for larger version. 

Name:	IMG_4214.JPG 
Views:	262 
Size:	106.9 KB 
ID:	6390 Click image for larger version. 

Name:	IMG_4215.JPG 
Views:	294 
Size:	135.4 KB 
ID:	6391

  7. #127
    Join Date
    Sep 2008
    Location
    Bucks, UK
    Posts
    2,233
    Blog Entries
    2685

    Default

    There was no way I could re-use the piston so replaced it with new one.
    The rear calliper overhaul kit with new piston, new bleeder plug and the cap.
    The rust was so severe that it even managed to get inside of the bleeder plug hole. The bleeder had to be replaced.
    Click image for larger version. 

Name:	IMG_4226.JPG 
Views:	266 
Size:	99.8 KB 
ID:	6392 Click image for larger version. 

Name:	IMG_4227.JPG 
Views:	257 
Size:	155.3 KB 
ID:	6393 Click image for larger version. 

Name:	IMG_4224.JPG 
Views:	265 
Size:	132.4 KB 
ID:	6394

    Rebuilding the parking brake mechanism.
    Using the OEM special tool to compress the spring used at the parking brake mechanism just behind the piston.
    Click image for larger version. 

Name:	IMG_4228.JPG 
Views:	259 
Size:	107.9 KB 
ID:	6395 Click image for larger version. 

Name:	IMG_4229.JPG 
Views:	270 
Size:	149.0 KB 
ID:	6396

  8. #128
    Join Date
    Sep 2008
    Location
    Bucks, UK
    Posts
    2,233
    Blog Entries
    2685

    Default

    Almost there...
    Using the piston tool to insert (rotate) it with the new dust boot and seal inside the calliper.
    As always, it is important to check the installation of dust boot by first extracting the piston to a certain level and then rotating back into the calliper. Throughout the process, the dust boot should show no twist and the piston should move smoothly.
    Click image for larger version. 

Name:	IMG_4231.JPG 
Views:	240 
Size:	164.7 KB 
ID:	6397 Click image for larger version. 

Name:	IMG_4232.JPG 
Views:	259 
Size:	151.4 KB 
ID:	6398 Click image for larger version. 

Name:	IMG_4233.JPG 
Views:	260 
Size:	146.0 KB 
ID:	6399

    Finally,the new bleeder plug installed and also applied special grease at the parking cable pin to keep it lubricated until next service.
    Click image for larger version. 

Name:	IMG_4239.JPG 
Views:	248 
Size:	148.5 KB 
ID:	6400 Click image for larger version. 

Name:	IMG_4240.JPG 
Views:	259 
Size:	156.9 KB 
ID:	6401

    I hope the owner will come back again in near future to complete the rest of high priprity service items.

    Regards,
    Kaz

  9. #129
    Join Date
    Dec 2007
    Location
    Switzerland
    Posts
    1,006

    Default

    Quote Originally Posted by kzukNA1 View Post
    The original fluid… Black. It should be clear unless you are using special brake fluid.
    Click image for larger version. 

Name:	IMG_4186.JPG 
Views:	302 
Size:	122.7 KB 
ID:	6380
    Good job! The fluid, was this the first and single one ever filled into the system?

  10. #130
    Join Date
    Sep 2008
    Location
    Bucks, UK
    Posts
    2,233
    Blog Entries
    2685

    Default

    I hope not...

    Having said this, the owner only got this NSX recently so who knows how old this fluid is....

    This was not the first time I saw this level of brake fluid on NSX, unfortunately.

    And it's not just UK based ones. The other day, LH drive NSX was at my place and the brake system was also very bad.

    Hope it will be looked after well from now on...

    Regards,
    Kaz

Page 13 of 58 FirstFirst ... 3111213141523 ... LastLast

Posting Permissions

  • You may not post new threads
  • You may not post replies
  • You may not post attachments
  • You may not edit your posts
  •