-

Just an update to say that the mechanical/service work is now completed - fired up first time with a new new battery - always a relief after major work!
Passed the MOT first time as well - advisors on rear tyres (expected, all 4 tyres being replaced at the same time as wheel refurb) and the MOT chap pointed out "some plonker has sprayed your rear lenses black - they`re too dark" - laquer coming off soon!
Off to confirm stuff with the paint/bodyshop later today.
Cheers, Dan.
-
Darn, The bodyshops backed up for a month - booked in but a bit of a wait.
A question - does anyone know how the outer roof trims that follow the window are attached? Bodywork chap wants to remove them as part of the strip down and thinks they may be bolted from the inside - thought I`d check before he starts pulling it apart.
Thanks, Dan.
-
You have to remove the rear pillar ( remove special nust from inside ) remove the weatherstrip and then you remove the screws.
The manual might give you a little more info but in short, no you can't just pull it off.
-
Hi, Dan.
Not sure exactly which parts you are referring to but if it is the Windshield Upper Molding as in my NSX Technical and Service Information Index 02 thread, then you just need to partially remove the weatherstrip and then remove the front pillar retainer.
You can see some photos from the above link.
From my experience, you will spend more time on cleaning the residue of adhesive tape than the actual installation of the upper fastener and the molding.
If we are talking about the same parts, then following TSB in the Wiki section of NSX Prime will provide your body shop with some idea.
http://nsxprime.com/wiki/TSB_93-013
Kaz
-
Thanks for that - its the side strips and B post cover that need to come off - I`ll print out Kaz`es pictures and a print from the prime link - should do the trick.
Theres a lot of bodywork that has to come off an NSX to do a proper job....
Thanks, Dan.
-
Take it easy with the interior panels as the tabs like to break!
-
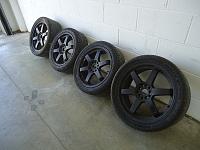
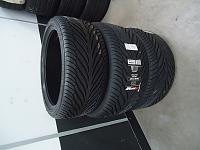
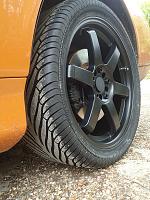
As I`m waiting on the bodyshop, thought I`d crack on with the wheels. As mentioned in another thread, its got aftermarket 17" front, 18" rear with the wrong (45) profile on the front - plenty of tread but naff make and advisery MOT just passed on the rear. All four tyres show good even wear, especially the almost bald rears - a good thing as its a good indicator of body alignment. Ordered up a new set of 215/40/17`s for the front, 265/35/181s for the rear, all Avon ZZ3`s - a tyre which I have always got on well with.
Booked it in with The Wheel Specialist in East Grinstead - 01342 300 687,eastgrinstead@thewheelspecialist.co.uk - Said I would give them a plug as they did a superb job. One rim was our of shape so needed welding and machining so the car was left with them for 48 hrs - would have been same day if no welding!
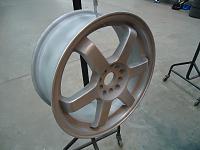
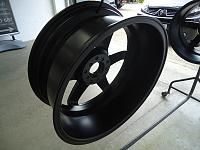
On arrival pics - the rims looked worse in real life as the paint had worn through:

Stripdown in the workshop:

-
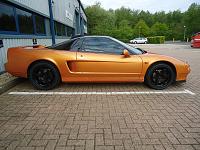
Satin black powder coated and a fresh set of tyres:
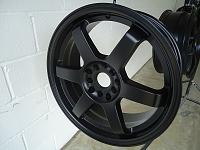
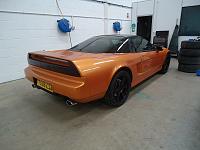
And back on the car:

-
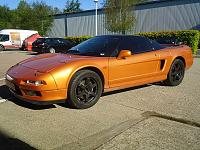
And just loving the final result....

-
Ok, the cars now being worked on at the bodyshop - they were delayed working on a big old yank that was in for the full works.
The car itself looked OK at a distance, but up close the panelfit was not up to scratch and the Imola Orange Pearl was not a perfect match following previous repairs - anyone who`s worked on pearl paints will tell you its almost impossible to match - one pass of the gun too much and its out! Coupled with a few scratches and scuffs it was felt a full strip down, check and paint was in order.
A couple of the chip/panel fit areas showing chips and paint blemishes:
DSC01791.JPGDSC01793.JPGDSC01794.JPGDSC01795.JPG - err... technical hitch - can`t figure out why they are not showing....
Last edited by Danny Boy; 16-07-2012 at 03:35 PM.
Reason: photos not showing
 Posting Permissions
- You may not post new threads
- You may not post replies
- You may not post attachments
- You may not edit your posts
-
Forum Rules


 Reply With Quote