
Can anone help with the part numbers for the A/C Dryer receiver, and expansion valve?
If it matters mine is a 91 Manual UK car.
Thanks chaps


Can anone help with the part numbers for the A/C Dryer receiver, and expansion valve?
If it matters mine is a 91 Manual UK car.
Thanks chaps
Current toys= MV Agusta Brutale, BMW K1200s, Mini cooper SD, Jaguar XF, Ex S2000 owner
91 NSX Owner between 16 July 05 and 18 Feb 2011
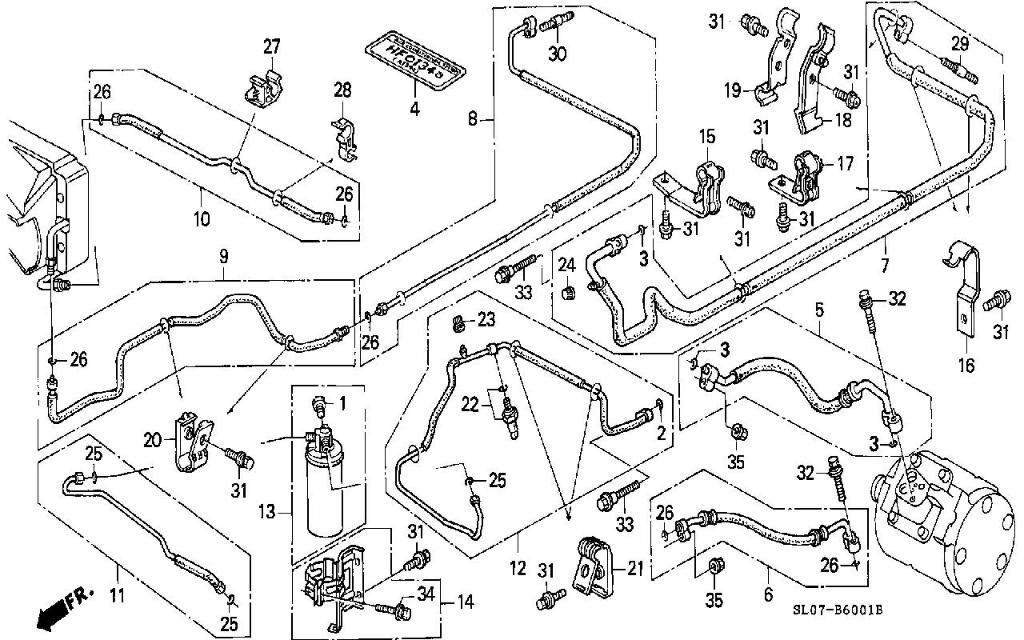
80315-SL0-A01 HOSE COMP DISCHAR, £268.06 plus VAT
Not showing in stock but there is another part number listed
80315-SL0-A02 HOSE COMP DISCHA £268.06 Plus Vat
Not sure what you mean by expansion valve? On the part pic below can you point it out?
Once you eliminate the impossible, whatever remains, no matter how improbable, must be the truth.
後は、残っているものに関係なく、不可能なことを排除する方法 ありそうもない、真実でなければなりません。
[QUOTE=Sudesh;Not sure what you mean by expansion valve? On the part pic below can you point it out?
[/QUOTE]
Well I've no idea, I was just advised by my A/C specialist that it's likely I would need to replace the expansion valve and receiver as my compressor was completely knackered and it was likely that there was swarf now in the system?
Sounds like I need them to verify (they have not seen the car yet)
Thanks for the numbers.
Current toys= MV Agusta Brutale, BMW K1200s, Mini cooper SD, Jaguar XF, Ex S2000 owner
91 NSX Owner between 16 July 05 and 18 Feb 2011
Ah yes I got you now! My old worn out brain is not going too good lol
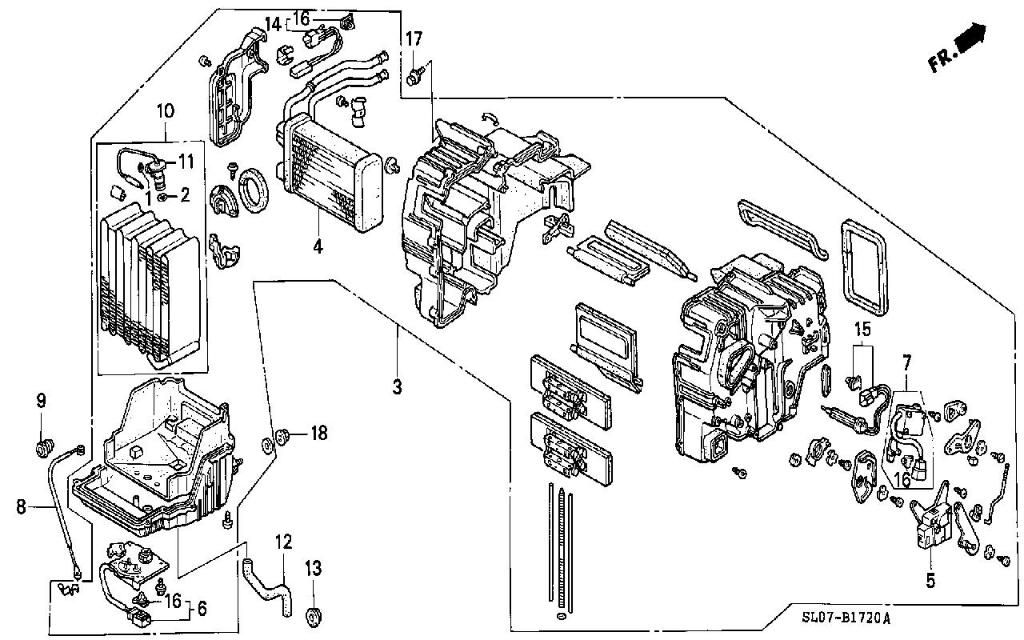
The valve is located at the evap unit.
Number 11
Part number: 80220-SF4-A01 £81.50 plus VAT
Also get number 2, the O ring
Part number: 80872-SL0-900 £2.87 plus vat
Last edited by Sudesh; 05-11-2010 at 07:23 PM.
Once you eliminate the impossible, whatever remains, no matter how improbable, must be the truth.
後は、残っているものに関係なく、不可能なことを排除する方法 ありそうもない、真実でなければなりません。
 Platinum Member
Hi,
91 car so R12 gas, different threads on expansion valve and receiver/dryer to later cars,
Reciever dryer No 13,
Expansion valve not shown on that parts diagram, it looks like a 90 degree domestic radiator valve and is screwed in line on one of the hard pipes on the front of the evaporator unit, take the heater fan blower motor off and you will see it.
It can be removed with the evaporater unit in place, fiddley but possible. Suggest both parts are removed and sent to compressor tech, see my earlier post to yourself,....
If you have A/c problems I can recommend a supplier called Compressor Tech/Motor Climate, 66-102 Cherrywood Road, Birmingham, 0121 766 5006, and ask for Bob Stokes.
As a price comparison between HUK and Compressor Tech [all excluding VAT];
Receiver/Drier £263.74-v-£20.79;
Expansion Valve £210.34-v-£28.95;
Compressor New-v-Refurbish £1286.12-v-£245;
Evaporator £910-v-built to pattern £295-£350;
Condensors [the radiators at the front] £?-v-built to pattern @ 16mm thick £275, 20-22mm thick £350.
All in all, not a difficult choice, that plus a lot of wisdom and the recommendation of a good local A/C guy [Brentwood, Essex] for the flushing, purging and gassing.
Before it all goes bang, remember that to remove the A/C compressor requires the removal of rear chassis braces, gear change linkage and front engine cross mount; replacement of the Evaporator is quoted at between 9 and 14 hours and will need the drain down of the coolant and the removal of the dash board. None of which you really want to to do/pay for unless you have to.
See the attached file for a service bulletin detailing the difference between the two gas types.
PM me or give me a call and I'll talk you through the process
Duncan
Last edited by duncan; 05-11-2010 at 07:32 PM.
Parts pics are accurate to that year and model of car! Honda do not change every single detail on parts pics to suit every variance of the model
Part numbers given are also to suit that year of car.
The car would have came from the factory as an R12 system, however unless someone has went to great expense over the years to change every single part to the according R134 setup then there will be no change in the AC parts.
Most will do the A/C upgrade by changing the R12 fill/extract Valves and leaving the rest pretty much as is.
Last edited by Sudesh; 05-11-2010 at 07:53 PM.
Once you eliminate the impossible, whatever remains, no matter how improbable, must be the truth.
後は、残っているものに関係なく、不可能なことを排除する方法 ありそうもない、真実でなければなりません。
CUSTOMER INFORMATION: The information in this bulletin is intended for use only by skilled technicians who have the proper tools, equipment,
and training to correctly and safely maintain your car. These procedures should not be attempted by do-it-yourselfers, and you should not assume
this bulletin applies to your car, or that your car has the condition described. To determine whether this information applies, contact an authorized
Acura automobile dealer.
YEAR MODEL VIN APPLICATION BULLETIN NO.
1986 93 INTEGRA ALL
1986 92 LEGEND
1992 94 VIGOR
1991 92 NSX
Converting R-12 A/C Systems to R-134a
BACKGROUND
Because of environmental concerns, production of
R-12 refrigerant is being phased out. Honda is making
retrofit kits available to convert systems that currently
use R-12 refrigerant to R-134a refrigerant use.
PREPARATION
Before retrofitting the A/C system to use R-134a, test
its performance and inspect all components.
If the system is not cooling correctly, determine the cause (restriction, refrigerant leak, system contamination, etc.) and repair it before continuing.
If the system is not fully charged, determine if there are any leaks and repair them before continuing.
If the compressor is making noise, repair or replace it before continuing.
Refer to Parts Information Bulletin B94-0028 for the proper components.
If the system has been open to the atmosphere,
replace the receiver/dryer.
RETROFIT KIT INSTALLATION
1. Use the R-12 recovery/recycling station to remove the R-12 from the system.
NOTE: Failure to remove all the R-12 from the system will cause contamination of the R-134a recovery/recycling station.
2. Disconnect the R-12 recovery/recycling station.
3. 1992 94 Vigor only: Remove the Schrader valves from the charge valves.
The retrofit valves in the kit have their own Schrader valves.
4. Use a shop towel wetted with Honda brake cleaner to clean the threads on the existing valves. Apply Locktite (included in the kit) to the threads of the existing valves.
Install the R-134a retrofit valves from the kit.
5. Connect the R-134a recovery/recycling station to the system. Evacuate the system.
6. Add 120 ml of PAG oil (included in the kit) to the system.
7. Determine the amount of R-134a refrigerant needed to charge the system by subtracting 50 ml (1-2/3 oz) from the systems R-12 capacity.
8. Charge the system with the proper amount of R-134a refrigerant.
9. Start the engine and let it idle. Turn the A/C system on and off several times. Listen for any abnormal noises.
10. Repeat step 9 with the engine running at 1,500 rpm and 3,000 rpm.
11. With the system on, check the cooling performance at the dashboard vents.
12. Check the high and low side pressures and compare them to the R-12 specifications. They should be slightly higher.
13. Turn off the A/C system and the engine. Disconnect the recovery/recycling station. Install the caps on the valves.
14. Place the R-134a caution label from the kit over the existing R-12 label. If the R-12 label is no longer there, place the R-134a label on the right damper housing.
PARTS INFORMATION
R-134a retrofit kit A:
1986 87 Integra P/N 38020-SM4-A2AH
1988 93 Integra P/N 38020-SM4-A1AH
1986 87 Legend P/N 38020-SM4-A2AH
1988 92 Legend P/N 38020-SM4-A1AH
1992 94 Vigor P/N 38020-SM4-A3AH
1991 92 NSX P/N 38020-SM4-A1AH
WARRANTY CLAIM INFORMATION
None; this retrofit is considered to be customer-pay.
95-008
Once you eliminate the impossible, whatever remains, no matter how improbable, must be the truth.
後は、残っているものに関係なく、不可能なことを排除する方法 ありそうもない、真実でなければなりません。
Wow you guys are good!
Many thanks for the combined wisdom.
Duncan, thats exactly whereI took my compressor, good old Bob, a very helpful chap who has completly rebuilt the compressor in 3 days for about £250.
Thanks again
Current toys= MV Agusta Brutale, BMW K1200s, Mini cooper SD, Jaguar XF, Ex S2000 owner
91 NSX Owner between 16 July 05 and 18 Feb 2011
 Posting Permissions

 Reply With Quote