Page 49 of 58 FirstFirst ... 394748495051 ... LastLast
Results 481 to 490 of 580

Thread: NSX Health Check Service

  1. #481
    Join Date
    Sep 2008
    Location
    Bucks, UK
    Posts
    2,234
    Blog Entries
    2685

    Default

    Kept running the system on the bench for a few hours and then started the actual installation on the NSX.

    Click image for larger version. 

Name:	Installation01.JPG 
Views:	230 
Size:	182.2 KB 
ID:	7826 Click image for larger version. 

Name:	Installation02.JPG 
Views:	252 
Size:	187.0 KB 
ID:	7827
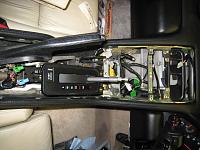
    Centre console removed to check the good GND for the head unit.
    Using several Tyrap to secure the adaptor cable that was connected to the factory pre-installed CD changer cable behind the seat.

    Click image for larger version. 

Name:	Installation03.JPG 
Views:	237 
Size:	187.6 KB 
ID:	7828 Click image for larger version. 

Name:	Installation04.JPG 
Views:	247 
Size:	166.3 KB 
ID:	7829
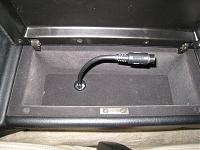
    Adaptor cable inside the arm rest box.
    USA Spec PA11-HON installed.

  2. #482
    Join Date
    Sep 2008
    Location
    Bucks, UK
    Posts
    2,234
    Blog Entries
    2685

    Default

    Click image for larger version. 

Name:	Testing01.JPG 
Views:	224 
Size:	175.9 KB 
ID:	7830 Click image for larger version. 

Name:	Testing02.JPG 
Views:	246 
Size:	150.5 KB 
ID:	7831
    Being tested with my old iPod mini. It will work with latest iPhone as well.
    Testing the system inside NSX. Playing 98th file.


    Finally, all the services are done and ready for the collection.


    Now need to work on another NSX straight away for brakes, driveshaft, ABS, etc and then another two NSXs for the TB/WP/Valve clearance plus one of them needs full coolant hoses service….

    I also need to work on my NSX as well.
    It’s time for the full timing belt service plus engine refresh including the Lost Motion Assy…

    I need more space, more tools and especially, the time.

    Will be back in the near future.

    Regards,
    Kaz

  3. #483

    Default

    Quote Originally Posted by Kaz-kzukNA1 View Post
    Honda revised the design of weatherstrip and the part no. was changed accordingly. It changed how the window glass sits/seals against the weatherstrip. The part no. for the original design was superseeded and you can only get the latest design these days.

    ...

    Because of this, if you work on the door window to improve the speed and adjusted the alignement or replaced some of the above parts, you may get water leakage or wind noise if you don't know the parts combination and how the door glass should sit on the weatherstrip.

    This is not even on the parts system or workshop manual and one of the special know-how.
    Kaz, does that mean that if you replace the window seals with new ones, you should not adjust the windows to the specifications in the Service Manual? In all the Service Manuals I have (physical for model year 1991 and various electronic up to model year 2005), the alignment specifications are all the same. If the proper alignment specifications have changed, it must be special know-how!

  4. #484
    Join Date
    Sep 2008
    Location
    Bucks, UK
    Posts
    2,234
    Blog Entries
    2685

    Default

    Hi, greenberet.

    There are lots of things not even touched in the workshop manual and it will be a long story if I start talking on them so I'll try to be short.


    Workshop manual is great for understanding the basic structure and reference for the torque spec and procedure.

    However, as it is on the paper or through the ordinary display, it is in just 2D.
    Also, because of its main purpose, each pages/sections is only focused on the specific part and not combining multiple parts as a total package.

    You need to be aware that there are several mistakes in the torque spec and some of the procedures were modified over the years.

    Some people may not agree with this but in my view, working on the car will have big difference in the final result or conditions over the years by having 3D imagination and looking at multiple parts as a total package rather than just a single part/section.

    For example, regarding the window alignment, the workshop manual is a good starting point but that is based on the new car came out of the factory.

    During its life, the car you are working on with may have some of the body panels replaced, the alignment of the door panel itself may have shifted by now, the window glass holder/support may have bigger play than when it used to be and so on.
    And on top of this, you need to check the combination of the sash and the weatherstrip.
    If you imagine the complex shape of the door glass and how it should sit over/against the weatherstrip, then you can evaluate the procedure, gap and torque figure in the manual to see whether they are the best and correct or not.

    By the way, I’m always impressed with the shape of the engine hatch glass. That beautiful curve alone is an art.


    Quite often, you can create or find different procedure by having the total package view.

    On top of these, almost always you will need to apply delicate final tweak for each NSX because although they were built by Honda, each NSX has different amount of spacers/shims/etc and thus, each of them are slightly different.

    If you have seen how the NSX was built at the factory, you will be amazed how each craftsmen use their fingers and palm to feel for the tiny difference in the shape/gap/alignment of each parts and adjust them.


    In my view, even if you provide exactly the same tools and workhshop manual, the outcome would be quite different depending on the delicate touch, imagination, etc of the person working on the car and for me, they are part of the special know-how.

    Kaz

  5. #485
    Join Date
    Sep 2008
    Location
    Bucks, UK
    Posts
    2,234
    Blog Entries
    2685

    Default

    Replaced the Air cleaner element on my NSX.

    Although there is a mileage based service interval for this item, I normally decide to replace it earlier by using the following method.

    Click image for larger version. 

Name:	OldNew.JPG 
Views:	256 
Size:	168.9 KB 
ID:	7847 Click image for larger version. 

Name:	NewWIthLED.JPG 
Views:	223 
Size:	138.6 KB 
ID:	7848 Click image for larger version. 

Name:	OldWithLED.JPG 
Views:	235 
Size:	182.4 KB 
ID:	7849
    The old and new ones.
    Honda changed the colour of air cleaner several years ago and it's green for the time being. What will be the next colour??

    I normally hold the air cleaner element against the sun and check whether I can see through enough sunlight or not.

    When the weather is not great, I just use LED light instead of the sun.

    I'm not great in taking photo under this kind of light condition so it doesn't show the actual amount of light passing through the filter but hope you can get some idea on what I was trying to do.

    Compared to the new one, the old one didn't pass through enough lights and so decided to replace it.

    Kaz

  6. #486
    Join Date
    Sep 2008
    Location
    Bucks, UK
    Posts
    2,234
    Blog Entries
    2685

    Default

    Once again, started to work on another NSX.

    It went though my Health Check awhile ago and brake, ABS, driveshaft, etc were the main areas to be addressed.

    There were some parts missing from the car but managed to catch up with the owner one night as I was just happened to be in the area close to his place.

    During my Health Check service, it was quite scary to drive this NSX.
    While you were pressing the brake pedal to slow down the car, the pedal was kicked back at super fast frequency every time when the car was just about to stop.

    The kick back frequency felt like 10 times faster than the normal ABS one.


    There was no ABS warning light nor any error codes stored.


    So, before start removing the parts, I decided to carry out further investigation on the strange brake pedal kick back.

    This time, I kept the window open and drove at very slow speed.

    I found that from time to time, the ABS pump was cycling almost every 10sec but not always.

    If I used the hard braking, the ABS will kick in properly so at least, some of the solenoids were operating correctly.

    Click image for larger version. 

Name:	ABSdisabled.JPG 
Views:	220 
Size:	119.1 KB 
ID:	7850
    I decided to force the ABS to fail by disconnecting/connecting one of the solenoids connector while the engine was running and carried out the same test driving procedure.
    This time, there was no issue at all and I didn’t feel a single kick back during the session.


    Considering the state of this ABS system, it is possible that it may have multiple issues.
    The system will be flushed including the four solenoids but it may require replacing the accumulator module like the member 'britlude' reported in his thread awhile ago.

    Depending on the usage of this NSX, considering the potential failure in the future and the benefit of the upgraded ABS kit, it may worth investing into the upgrade than trying to repair this 1st generation system.

    To be discussed with the owner later.


    Time to prepare the car for the services.

    As the car was quite dirty, I decided to wash it first as I didn’t want to scratch the paint work with my cloth and also there were some sort of mould built up between the wiper and the bottom of the windshield.

    Click image for larger version. 

Name:	EngHatchSW01.JPG 
Views:	226 
Size:	162.8 KB 
ID:	7851 Click image for larger version. 

Name:	EngHatchSW02.JPG 
Views:	243 
Size:	181.7 KB 
ID:	7852
    While briefly looking inside the engine bay, I noticed that the connector for the engine hatch glass switch was partially disconnected. Turned out it was done on purposely as the engine hatch switch was already dead and continuously creating short circuit.

    The bonnet opener/lock was stuck so gave it a good clean.

  7. #487
    Join Date
    Sep 2008
    Location
    Bucks, UK
    Posts
    2,234
    Blog Entries
    2685

    Default

    The initial check on the general condition of the car.

    Click image for larger version. 

Name:	Corrosion01.JPG 
Views:	255 
Size:	145.1 KB 
ID:	7853 Click image for larger version. 

Name:	Corrosion02.JPG 
Views:	246 
Size:	199.0 KB 
ID:	7854 Click image for larger version. 

Name:	Corrosion04.JPG 
Views:	254 
Size:	146.6 KB 
ID:	7856
    There were lots of corrosion on the bolt, nuts, etc around the brake area.

    Click image for larger version. 

Name:	Corrosion03.JPG 
Views:	276 
Size:	214.0 KB 
ID:	7855
    I’m quite sure I’m going to struggle with these fittings at each corners. Quite often, the fitting and the pipe bonded each other due to heavy corrosion and if you tried to turn the fitting, it would twist the pipe.

    I'll first need to turn the hose side to disconnect it from the fitting and then use my fingers to break the bonding between the fitting and the pipe. I love challenges....


  8. #488
    Join Date
    Sep 2008
    Location
    Bucks, UK
    Posts
    2,234
    Blog Entries
    2685

    Default

    Click image for larger version. 

Name:	DRshaftGrease.JPG 
Views:	229 
Size:	200.4 KB 
ID:	7857
    The right side drive shaft splashed so much grease everywhere that I’ll need to spend long time for cleaning the area.

    Click image for larger version. 

Name:	DRshaftRightTrigger02.JPG 
Views:	227 
Size:	143.7 KB 
ID:	7858 Click image for larger version. 

Name:	DRshaftLeftTrigger01.JPG 
Views:	234 
Size:	160.1 KB 
ID:	7859
    The wheel speed trigger teeth at the drive shaft were covered in lots of debris.
    Could be related to the cause of ABS issue but it only happens at dead slow speed so not sure.

    Will check the state of the wheel speed sensor head once I have removed the drive shaft.
    At this stage, it is not planned to work on the left side but I may need to do it as the trigger teeth was in similar condition....


    Click image for larger version. 

Name:	FrontBR.JPG 
Views:	226 
Size:	165.9 KB 
ID:	7860 Click image for larger version. 

Name:	RearBR.JPG 
Views:	241 
Size:	171.4 KB 
ID:	7861
    Both Front and Rear brake callipers looked never serviced in the past....
    Can't wait to see the inside.....

    Another long long days with NSX starts from here...

    More to follow.

    Kaz

  9. #489
    Join Date
    Dec 2007
    Location
    Switzerland
    Posts
    1,006

    Default

    Wow, there's heavy corrosion on the metal parts.

  10. #490

    Default

    Dear Kaz, thank you for the explanation. It makes perfect sense and reminds me of what a specialist shop told me years ago about my motorcycle.

    They said that the manufacturer recommended service plan was developed for the needs of the motorcycle when it was new. As it gets older, additional points need to be addressed and procedures need to be adapted. After a certain point, blindly following the service manual is no longer what is best for the machine. Based on the factory service manual and their own experience, the shop developed a new service plan tailored to the needs of older motorcycles of my make and model.

    Thinking about it, my NSX would surely also benefit from such sympathetic care instead of simply following the service manual.

Page 49 of 58 FirstFirst ... 394748495051 ... LastLast

Posting Permissions

  • You may not post new threads
  • You may not post replies
  • You may not post attachments
  • You may not edit your posts
  •