
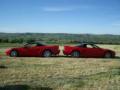
Not too bad, will be a lot better when the swine of a Prelude is back on the road and working.
Originally Posted by DTA-Motorsport


Not too bad, will be a lot better when the swine of a Prelude is back on the road and working.
****1997 3.2 Orange / Black SOLD****
Previously driven by.........
Jeremy Clarkson, Tim Harvey, Richard Burns (RIP), Jason Plato, Harvey Postlethwaite (RIP), Manfred Wollgarten, Dirk Schoysman, Barrie Williams.
Nurburgring lap time 8:38 - Honda NSX (sport auto, 08/97)
Shreik in horror sir?
Like a girl sir?
Not me sir
1998S 3.2 red/black manual 4 years of great memories
2004 54 red/red manual
---------------------------------------------------
Quote autocar Nov 2005
"Before the NSX supercars were crap"
I'm sorry, that must have been the shriek I heard as you dropped one of the headlight cover bolts down the front of your car ... ;-)
BTW - your parcel will be out the door tomorrow.
Cheers mate!
Dan
 Administrator
Sidelights received, install took ten minutes total and the difference is amazing!! Best bit of info on the instructions is that the retaining screw DOES NOT FULLY RELEASE.
Thanx to Luke for arranging the new bulbs, very much appreciated!
regards, Paul
PS, definately no girlie shrieks required!
Senninha
'Too many manufacturers today are obsessed with lap times and power outputs at the expense of emotion and fun' Colin Goodwin
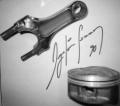
S2 is signed by the NSX Project Leader Shigeru Uehara

the problem with the retaining clip / screw things is - they do rust over time.
I successfully changed mine a year or so ago - but a few weeks back went to put the Blue Visions in and - as is always the way - one came out no probs - second one refused to budge - and I successfully burred the head off the screw.
Luckily I had already bought replacement clips as I knew they were rusting:
Part no is: 33303-SLO-A01
Was thinking the bumber / headlights would have to come out ... but eventually got mine out by:
1) position long screw driver on the edge of the plastic housing and bang with hammer until you break it off! Do both 'halves' as its like a hinged cylinder.
2) this leaves screw exposed - jam a socket over it - I think I used a 8 or 9mm socket on a long extension - jams over nice and tight with a gentle tap of a hammer and then ratchet it out!
3) install nice new shiny ones
Worked for me!
Paul
1997 3.2 NSX-T : Ext. Magnum Grey : Int. Red / Black

Apologies for resurrecting a three-year-old thread, but guess what?
Yep - that bloody screw won't come out, and in trying to get it out i've cracked the 'sleeve' that guides the screwdriver up to the screw-head! So now even if the damned head isn't burred it's impossible to line-up on it anyway. And with an MOT due on Wednesday!
So, thanks to Duncan and Paul for advice on how to DIY it (Paul - if you're still around can you elaborate a bit more for this less-than-skilled owner, please?)...
...and can anyone tell me whether it's possible to replace that sleeve, and if that requires similar levels of skill/dexterity to the screw (in which case I'm scuppered already)???
(I wish I'd read this first...not that it'd necessarily have made much difference)
"No man with a good car needs to be justified"
Blue '08 FD2 CTR - big, ITR-sized shoes to fill...
Yellow '96 NSX 3.0 - oh was it worth the wait!
Black '99 ITR - well, I had to have another one, the first was so much fun. Miss this one even more than #1...
Blue '03 S2000 - SOLD, flawed but fun
Blue '04 Focus TDCi Sport - SOLD, very good fun for a diesel!
Black '00 ITR - SOLD, still missed
Red '98 Civic VTi - SOLD, probably still bombproof
 Platinum Member
Hi, havoc.
Once you get to know the structure of this screw/cylinder parts, its fairly easy.
Not sure what is your priority/objective to prepare the car in time for the MOT but if you want to replace the light bulbs without spending long time trying to remove the rusty screw, then it is best to access the bulbs from the top.
As other members mentioned, you can do this by shifting the headlight unit.
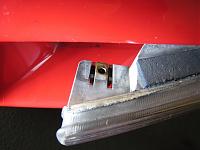
If you want to replace the indicator unit, then following diagram and photos will provide you with some idea. As you managed to crack the cylinder already, you are not that far off any way.
If you click on the image, it will pop up new window with enlarged image.
The indicator unit.
The screw with the cylinder that you cracked is #7.
As in Pauls post, its 33303-SL0-A01. HUK GBP5.92+VAT
There is a tab at the outer edge of the indicator unit which is inserted to the recess at the front bumper. This tab is pushed against the bumper from the back by the spring #21.
At the top and bottom of the indicator unit, there is a cushion tape to prevent scrach/noise. This could get sticky and bond the unit to the bumper so you may require lots of force to pop out the unit as described by other members.
It is best to apply masking tape on the bumper face around the indicator unit to prevent any scratches.
The tip is to push the outer edge of the unit towards the rear of the car to overcome the spring force and gently pull the inner edge towards you.
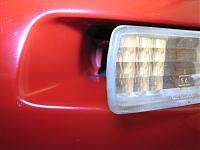
The inner edge will come out towards you like this.
From the top. The cylinder with the screw inside is just below the hole in the centre of the 2nd photo. The screw wont come out (down) all the way when loosening it.
The screw.
Platinum Member
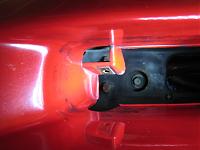
The spring nut at the bumper structure. This is where the screw is inserted.
The cylinder. Just four tiny clips holding it to the indicator unit. Screw is inside there.
Based on these photos and diagram, I hope you can loosen far enough the rusty screw so that you can pop out the indicator unit.
Regards,
Kaz
Perfect Kaz - thanks for that - came in very handy this afternoon. In the end the screw could be got out and I've replaced it with a less-rusty one!
Bulbs are now sorted for the MOT, but I've checked the other side and it looks to have been completely burred / drilled-out by a previous owner, so I need to think about whether to try and 'pry' that side out (and then replace the broken 'sleeve' - I've seen it's just attached by 4 small lugs at the top of the plastic sleeve), or just go through the headlamp when the bulbs on that side need replacing.
"No man with a good car needs to be justified"
Blue '08 FD2 CTR - big, ITR-sized shoes to fill...
Yellow '96 NSX 3.0 - oh was it worth the wait!
Black '99 ITR - well, I had to have another one, the first was so much fun. Miss this one even more than #1...
Blue '03 S2000 - SOLD, flawed but fun
Blue '04 Focus TDCi Sport - SOLD, very good fun for a diesel!
Black '00 ITR - SOLD, still missed
Red '98 Civic VTi - SOLD, probably still bombproof
 Posting Permissions

 Reply With Quote