
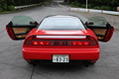
Here are two more pictures (click to enlarge):

 Platinum Member

Here are two more pictures (click to enlarge):
1997 JDM Custom Order AT VIN 1400005 - Stock
Heineken's Garage
 Platinum Member
Hi, Heineken.
Thank you for the extra photo.
That is exactly what I wanted to check and the reason why I asked to take the photo with the rubber blade in the air without touching anything.
On JDM, the blade length is 550mm long whereas the European replacement ones (driver & passenger) are 500mm even for the UK RHD spec.
With the OEM RHD 550mm wiper blade, the rubber section would stay in straight line for the driver side when placed in the air without touching anything, just like in your 1st photo above.
At the passenger side, due to the angle of the wiper blade against the curve/R of the 3D windshield, the rubber blade is on purposely curved by the two silver metal inserts, again, just like in your photo.
So, you are indeed using the OEM wiper blade set.
I looked into the issue of passenger side wiper arm scratching against the bonnet well over 10 years ago and thus, need to refresh my memory so some of the info could be dated or even wrong so please take that into consideration.
Tried to find some photo but at that time, I was focusing more on the lower windshield visor (or whatever it's called) held by the multiple yellow clips so couldn't find suitable one.
Based on your video, looks like you already have good access to the wiper motor/linkage assy so hope you can understand my poor explanation below.
By the way, I was about to say not to try removing the wiper motor assy without first getting hold of the extra spare yellow clips.
Though, in your video, somehow you managed to remove the meshed plastic cowl/tray without first removing the lower metal visor unless you just placed it back.
Anyway, as Old guy mentioned in post no.7, the passenger wiper arm is operated through the linkage with a shaft passing through the wiper motor/linkage assy.
It's long and just below the black plastic sleeve #6 in the diagram.
The bottom side of this shaft is indeed held by the E-clip/circlip as Old guy mentioned.
There are also a metal washer and o-ring to prevent the moisture getting inside.
At the other side where the shaft meets the short metal link (protected by plastic cover #6) sits, there are a spring washer pressing against another metal washer with the o-ring behind.
There is a different metal material bushing (what Old guy called as bronze bushing) pressed into the aluminium alloy wiper motor/linkage assy where the shaft rotates.
If I remember correctly, just like the CL release bearing, there is a single slit inside the metal bushing to trap the grease.
Because of the spring washer, I can see you would get small vertical play along the shaft axis but should be very limited sideway movement around the shaft considering the shaft length unless the metal bushing was heavily worn.
What I found interesting at that time was the way Honda installed this whole assy.
On the right side chassis frame near right front wing/fender, there are two notches/pins sticking out horizontally (2 x blue arrow).
At one end of the wiper motor/linkage assy, there are two rubber cushion grommets (2 x #3) mounted at the blue dots.
The two pins are inserted into these two rubber cushions at the blue dots and no fixing bolts/nuts involved.
Addition to these, Honda used further three rubber cushion (3 x #4) with the metal collar inserted to each cushion (3 x #5).
They are mounted at the red and yellow dots.
At the two red dots, the washer bolt (2 x #21) was used to squash the rubber grommet down against the chassis frame.
Due to the design of the linkage, you can't access the rubber grommet hole from above at the yellow dot location.
Thus, no bolt used there and the rubber grommet + the metal collar just sits against the chassis frame.
I would say almost all NSX that I removed the meshed cowl/tray showed scratch marking there as the metal collar was touching the painted surface. Some even had rust there.
The use of rubber mounting is nothing new around the wiper motor and most of the cars are using it.
As a side note, with the engine at the back on our NSX, the thermal shock condition seemed to be in much better condition compared to other ordinary production cars with the engine under the front bonnet/hood.
Quite often on other cars with the engine at the front, you would see the white plastic holder ( the dome shaped parts, opposite to the rubber seal parts #8) at the ball joint of the linkage cracked/worn causing big play or noise.
Never seen on our NSX.
However, with the age and the heat cycle, the rubber cushion #3 and #4 hardened and took set allowing some play around two pins (2 x blue arrow) and reduced torque at two bolts (2 x #21) at the two red dots.
The ID of the metal collar #5 is much larger than the body diameter of the washer bolt #21.
Thus, over many years, the entire wiper motor/linkage assy can shift and even change its alignment against the chassis frame.
Similar to the reason why we should not use the cheap jubilee clip on OEM EPDM rubber coolant hose.
Instead, should use either the OEM hose band or invest in the high quality jubilee clip.
When you use the aftermarket wiper blade that raises the wiper arm slightly, it should not cause this 'scratch' issue because the actual pivot is behind/below where the wiper arm scratches against the back of the bonnet.
However, my observation was that the increased height of the wiper arm would increase the spring tension of both the driver and passenger wiper arm towards the motor/linkage assy.
Also, the force would change during the wiper operation.
With this increased force and because of the way the wiper motor/linkage was mounted as described above and the diameter difference between the metal collar #5 and washer bolt #21, the entire assy can tilt or even shift once the rubber cushion loses its plumpness.
I could be wrong but that was my view at that time as I only saw the scratch issue on NSX with the aftermarket wiper blade in use.
Not with the OEM one unless other factors played the role.
Some even showed immediate improvement by just replacing the wiper blade back to the OEM even without going through the heat cycle.
As stated at the beginning, your NSX is indeed using the OEM wiper blade.
However, at least the passenger side wiper arm was installed incorrectly.
This is likely to be one of the factor for the scratch issue even when you were using the OEM wiper blade.
So, there is still a chance that you may have bent wiper arm at the passenger side but since you already have good access to the wiper motor/linkage assy, I would first try replacing all of the rubber cushions (2 x #3, 3 x #4).
Don't know the latest price of the passenger wiper arm #16 but used to be not that expensive so may as well replace it any way.
In order to remove the wiper motor/linkage assy, you need to first remove the lower windshield visor held by lots of yellow clips before lifting/removing the plastic meshed cowl/tray so please get hold of the new yellow clips with extra spare as most likely, the locking tabs are dead by now and not recommended re-using them.
Kaz
Last edited by Kaz-kzukNA1; 08-11-2021 at 07:39 PM. Reason: meshed tray/cover -> meshed cowl/tray, format
Platinum Member
Thank you very much for the extensive information provided, I can confirm all mentioned aspects and will order the rubber bushings.
The yellow clips are an interesting topic. For the conversion to LHD traffic the OEM HID lights were removed, including the driver packs on the left hand side of the cowl area. This task was performed by the import company and obviously they disconnected all the yellow clips without replacing or even re-installing them properly - that's the reason why the cowl cover could be removed so easily ..
Some rubbers are on backorder and might take three months to be delivered but since it's almost winter it isn't that much of an issue.
Last edited by Heineken; 09-11-2021 at 05:59 PM. Reason: typo
1997 JDM Custom Order AT VIN 1400005 - Stock
Heineken's Garage
Platinum Member
After as significant delay I was able to install the new rubber grommets and a new wiper arm. The old rubber parts were in OK condition and unfortunately, the situation is nearly unchanged.
Since this would rule out the rubber mounting points and the wiper arm being bent I'm back at excessive play at the passenger wiper arm bushing.
Looks like I'll need to order a new wiper assembly ..
1997 JDM Custom Order AT VIN 1400005 - Stock
Heineken's Garage
Platinum Member
Since Japan Post has suspended air shipment and the part is too big for surface shipment I'll try my luck with a used part that showed up.
1997 JDM Custom Order AT VIN 1400005 - Stock
Heineken's Garage
Platinum Member
The used item turned out to be a brand new part (note the more-or-less undisturbed grease at the end of the linkage arm):
All that's required are the three motor mounting bolts and the piece that connects the motor drive shaft to the first linkage arm - all could be transferred from the old setup:
Didn't have time to install everything yet but it should allow for a good analysis of the initial root cause
1997 JDM Custom Order AT VIN 1400005 - Stock
Heineken's Garage
Platinum Member
Spent the evening in the garage to install the new wiper linkage and hoping this would resolve the issue but I was wrong and I'm out of ideas
The new linkage has less play than the old one (that's good) but not by a large margin (not so good).
The clearance (on an unscratched bonnet) I could create is just barely one or two milimeters which I don't consider sufficient (the arm was installed while being pushed to the glass):
Another observation I made is the very small clearance between the wiper arm mounting shaft and the bonnet:
When installing the arm and the domed nut, the clearance it's nearly zero. When slightly pushing the bonnet with one finger, it hits the domed nut:
The only way I was able to obtain sufficient clearance at both the arm and the domed nut was to install the wiper arm linkage without the three metal sleeve rubber mounts and move the assembly as far away from the glass as possible.
Since this can't be the original intention from Honda I'm asking for advice how to continue .. does the bonnet settle over time?
Last edited by Heineken; 29-04-2022 at 07:30 PM.
1997 JDM Custom Order AT VIN 1400005 - Stock
Heineken's Garage
Platinum Member
Checking with Andrew from NSX Prime: The clearance between the bonnet and the glass (is 40 mm but should be 45-50 mm) is too small and correspondingly affects the clearance between the domed nut and the bonnet (is 1 mm should be 5 mm).
Could someone in the forum check the clearance of the domed nut on their car?
Maybe my bonnet is simply too "flat" and does not leave enough space for the wiper linkage and arm. This could be due to manufacturing tolerances, the bonnet "sagging" over time or it's simply bent.
I checked if it's possible to bend the hood upwards (by hand) but it's way too sturdy.
Currently I'm wondering if it would be better trying to lower the linkage by modifying the mounting rubbers or getting the hood to a body shop .. what would be your suggestions?
1997 JDM Custom Order AT VIN 1400005 - Stock
Heineken's Garage
 Administrator
Platinum Member
Administrator
Platinum Member
I'd check mine for you but I have an aftermarket bonnet, so no good.
Is there any adjustment available in the height of the bonnet, without causing panel gap issues?
Platinum Member
According to the manual the hood height near the glass is controlled via shims at the bonnet hinge - but the hinge bolts are untouched. All the gaps and heights are flush.
Further down towards the front there are rubber stops and finally the hood lock. There seems to be no way to adjust the height without lifting everything up - but I'm having zero experience with such things.
1997 JDM Custom Order AT VIN 1400005 - Stock
Heineken's Garage
 Posting Permissions

 Reply With Quote