Page 1 of 3 123 LastLast
Results 1 to 10 of 21

Thread: Rear suspension refresh (picture heavy, HURRAH!)

  1. #1
    Join Date
    Sep 2005
    Location
    Garden of England
    Posts
    2,775

    Default Rear suspension refresh (picture heavy, HURRAH!)

    I hope you are sitting comfortably……

    Following on from the ball joint drill and tap for a grease nipple debarkle, the order was place with amayama and tigawa for parts, and once they had arrived, AND I got a free time slot to do stuff, a plan was formed, the car put on axle stands, and then stop for tea….

    IMG_20231005_174448 by JON SUTH, on Flickr

    Fortunately (or unfortunately) I had to buy a commuter car as work moved, so the NSX doesn’t have to be back together for Monday’s commute, which makes a pleasant change….

    Invest in a decent ball joint splitter

    £50 off ebay…..
    s-l1600 by JON SUTH, on Flickr

    IMG_20231006_104741 by JON SUTH, on Flickr
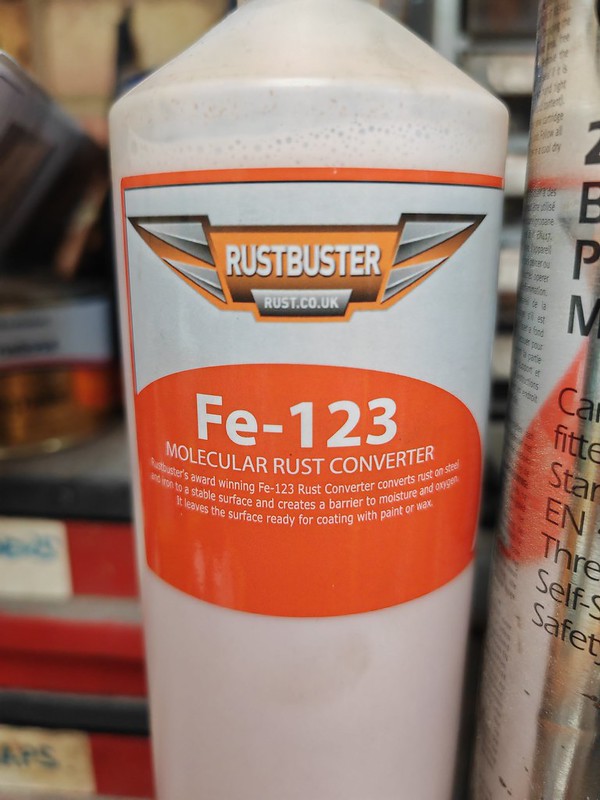
    The replacement parts….
    IMG_20231006_105829 by JON SUTH, on Flickr

    The top ball joint rubbers were getting crusty (I’d already sourced the OEM parts to replace all the rubbers, but the top ball joint was shot so they are now surplus) so I decided as it would be apart, to replace all the ball joint bits…. 178k miles, so due anyway!

    While the suspension was off, might as well pull the driveshafts, one rubber boot clamp had loosened somehow, so it was sliding on the shaft, and possible grease leakage, so needed looking at anyway…
    IMG_20231006_131724 by JON SUTH, on Flickr
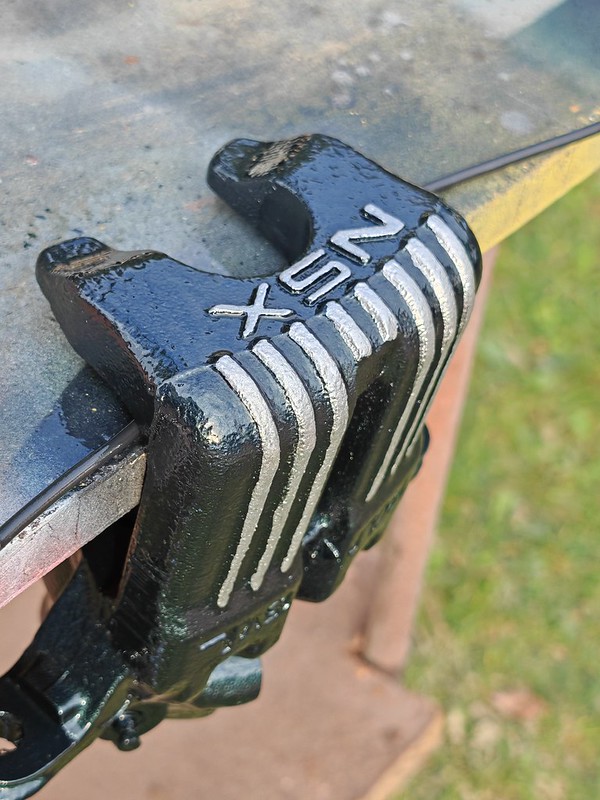
    Top ball joint…..


    Hmmmm…. Floppy

    Took the ball joints out of the upright (brute force and ignorance) and gave one a clean…. It sorta cleaned up, but could be better….
    IMG_20231006_171500 by JON SUTH, on Flickr

    And the wheel bearing assembly….. I’ve replaced these before, (I have new rockauto bearings to put in (wholesale closeout at $21 each!!!)) but this one has always niggled me….
    IMG_20231006_171751 by JON SUTH, on Flickr


    Do you see the issue?? it’s shocking…… no? let me zoom in on the area of shame….


    IMG_20231006_171808 by JON SUTH, on Flickr

    Told you it was shocking!!!!
    aka Jonathan!!

    '92 charlotte green auto.... as a daily
    '37 Ford Y street rod......... something for the weekend!

    ...... if a photobucket pic is foggy, click it, and it'll take you to the clear version, yes, it's a clicking faff....

  2. #2
    Join Date
    Sep 2005
    Location
    Garden of England
    Posts
    2,775

    Default

    Now, I knew sand blasting would be too harsh on the aluminium, so I thought I could find somewhere with a vapour blaster setup… then thought that’s just sand blasting with water…. So….. I bought a sandblasting attachment for the pressure washer….


    IMG_20231007_091629 by JON SUTH, on Flickr


    A whole £16, and about £6 for some kiln dried paving sand…. And tried it on the old top arm….
    IMG_20231007_091231_1 by JON SUTH, on Flickr


    Yup, that works, and a smooth satin, not sandpapery rough finish… but first I had 2 broken bolts to sort…..


    A broken bolt, cos you’ve never seen one…
    IMG_20231007_130605 by JON SUTH, on Flickr


    Weld a nut on poorly
    IMG_20231007_130651 by JON SUTH, on Flickr


    The combo of something to spanner on, and the glowing heat of the welder, means it breaks the seal and unwinds!
    IMG_20231007_131056 by JON SUTH, on Flickr


    A quick demo on the pressure blasting, it really is that quick…


    Before and after is quite impressive
    IMG_20231007_134902 by JON SUTH, on Flickr


    As it was all apart, and I had a set of rear calipers, with rebuild kit, half done (for months, with total apathy) I was prompted to finish them….


    IMG_20231007_152722 by JON SUTH, on Flickr


    IMG_20231007_163206 by JON SUTH, on Flickr


    IMG_20231007_163710 by JON SUTH, on Flickr
    Last edited by britlude; 20-10-2023 at 11:25 AM.
    aka Jonathan!!

    '92 charlotte green auto.... as a daily
    '37 Ford Y street rod......... something for the weekend!

    ...... if a photobucket pic is foggy, click it, and it'll take you to the clear version, yes, it's a clicking faff....

  3. #3
    Join Date
    Sep 2005
    Location
    Garden of England
    Posts
    2,775

    Default

    And rebuild…
    IMG_20231008_122133 by JON SUTH, on Flickr

    Ready to go back on…
    IMG_20231008_132330 by JON SUTH, on Flickr

    IMG_20231008_132352 by JON SUTH, on Flickr

    And now back to the nice clean uprights….
    IMG_20231008_133012 by JON SUTH, on Flickr

    IMG_20231008_133015 by JON SUTH, on Flickr

    Bought another tool, £40….
    s-l1600 by JON SUTH, on Flickr

    But had to make it NSX specific, of course….
    IMG_20231008_142045 by JON SUTH, on Flickr

    And the balljoint simple wound in, no drama!
    IMG_20231008_142059 by JON SUTH, on Flickr

    NSX tax applies to these….. we all know they are probably £30 IF you know which normal car they also fit….. https://www.tegiwaimports.com/hardra...x-na1-na2.html


    Next up is the wheel bearings, I bought just the bearing/carrier, not the hub too, so you have to press out the hub…. Had to find a proper press, my kit wasn’t oomphy enough
    IMG_20231009_080723 by JON SUTH, on Flickr
    Last edited by britlude; 20-10-2023 at 11:27 AM.
    aka Jonathan!!

    '92 charlotte green auto.... as a daily
    '37 Ford Y street rod......... something for the weekend!

    ...... if a photobucket pic is foggy, click it, and it'll take you to the clear version, yes, it's a clicking faff....

  4. #4
    Join Date
    Sep 2005
    Location
    Garden of England
    Posts
    2,775

    Default

    This leaves the inner race behind,
    IMG_20231009_081235 by JON SUTH, on Flickr

    So you have to get busy with a grinder, to carve an edge for the more conventional bearing pullers to work on…. Eventually they move, and you have the hubs…
    IMG_20231009_183945 by JON SUTH, on Flickr

    Then paint the backs, cos you can….
    IMG_20231009_184938 by JON SUTH, on Flickr


    Meanwhile… grotty bolts…..
    IMG_20231010_192155 by JON SUTH, on Flickr

    I could have bought shiny new, but I didn’t, life is too short to dredge parts diagrams, and def too costly… I could have had them replated, a place near me does them by the weight (Phil knows!) but I was concerned about the ‘special coating’ as they go into aluminium, and galvanic oxidisation is a mare, so I decided to clean and reuse….

    Wire brushed off, cos no-one knows what that looks like
    IMG_20231010_192201 by JON SUTH, on Flickr

    Then treated with my fav rust converter/stabiliser gunge….
    IMG_20231010_194749 by JON SUTH, on Flickr

    Pretty much the best stuff I’ve found…
    IMG_20231010_201440 by JON SUTH, on Flickr

    Meanwhile….. you try to find the correct grease for the axle, in enough quantity to do the job in this country… try as I might I couldn’t find the correct honda custard grease outside gaiter kits, trawled google and forums, conflicting arguments for everything, until I happened upon
    IMG_20231011_164622 by JON SUTH, on Flickr

    IMG_20231011_164656 by JON SUTH, on Flickr

    The NSX has tripod(e) joints, not CV joints!
    Last edited by britlude; 20-10-2023 at 11:29 AM.
    aka Jonathan!!

    '92 charlotte green auto.... as a daily
    '37 Ford Y street rod......... something for the weekend!

    ...... if a photobucket pic is foggy, click it, and it'll take you to the clear version, yes, it's a clicking faff....

  5. #5
    Join Date
    Sep 2005
    Location
    Garden of England
    Posts
    2,775

    Default

    So start with this…
    IMG_20231013_125006 by JON SUTH, on Flickr

    Open it up to the mess from hell!
    IMG_20231013_130816 by JON SUTH, on Flickr

    Tale it apart, and clean up….
    IMG_20231013_130820 by JON SUTH, on Flickr

    Looks ok
    IMG_20231013_130828 by JON SUTH, on Flickr

    Bearings all felt fine, so decided not to split them and have a pile of needle bearing to deal with
    IMG_20231013_130833 by JON SUTH, on Flickr

    And ready to reassemble… (using a tube of grease for each axle!)
    IMG_20231013_133158 by JON SUTH, on Flickr


    So…. Ready for the rebuild….
    IMG_20231014_113027 by JON SUTH, on Flickr

    Going back together….
    IMG_20231014_120729 by JON SUTH, on Flickr4

    IMG_20231014_123737 by JON SUTH, on Flickr

    The ABS sensor was put in with lashings of grease around the body and in the hub… the ali had corroded and gripped the sensor when I went to remove it (one side necessitating the removal of all the wiring to gently drift it out on the bench…) not doing that again, so well lubed!
    Last edited by britlude; 20-10-2023 at 11:31 AM.
    aka Jonathan!!

    '92 charlotte green auto.... as a daily
    '37 Ford Y street rod......... something for the weekend!

    ...... if a photobucket pic is foggy, click it, and it'll take you to the clear version, yes, it's a clicking faff....

  6. #6
    Join Date
    Sep 2005
    Location
    Garden of England
    Posts
    2,775

    Default

    The other side was built up to the same stage, as I was waiting for the brake back plates to dry…
    IMG_20231014_132537 by JON SUTH, on Flickr

    These have to go on BEFORE the hubs…..
    IMG_20231014_150452 by JON SUTH, on Flickr

    Disc and caliper on, just need to do the drive shaft nut up uber tight….
    IMG_20231014_151607 by JON SUTH, on Flickr

    Spot the difference…
    IMG_20231014_171746 by JON SUTH, on Flickr


    Before I stripped it all, I noted the rear alignment… basic, but does the trick
    IMG_20231015_133802 by JON SUTH, on Flickr

    Green dot nearly in the gap….
    IMG_20231015_134005 by JON SUTH, on Flickr

    Did you spot the difference?
    IMG_20231015_140256 by JON SUTH, on Flickr

    IMG_20231015_140301 by JON SUTH, on Flickr


    Yup, crusty, I did have a go at powder coating these a few years ago, but I obvs didn’t get it right, mostly, but not completely!... so….blasted, it’s steel, so dry is fine!
    IMG_20231015_150736 by JON SUTH, on Flickr

    Rust treated, and painted black…
    IMG_20231015_182952 by JON SUTH, on Flickr
    aka Jonathan!!

    '92 charlotte green auto.... as a daily
    '37 Ford Y street rod......... something for the weekend!

    ...... if a photobucket pic is foggy, click it, and it'll take you to the clear version, yes, it's a clicking faff....

  7. #7
    Join Date
    Sep 2005
    Location
    Garden of England
    Posts
    2,775

    Default

    (forgot the pic, but i also blasted the inboard end of the track control arm....
    2023-10-21_07-28-49 by JON SUTH, on Flickr


    While I was under there, popped off the exhaust…. it has been a long while since i made it!!!
    IMG_20231016_172307 by JON SUTH, on Flickr

    And the cat shields (2 already brightened up!)
    IMG_20231016_175152 by JON SUTH, on Flickr

    Cleaned up the other 2
    IMG_20231016_180333 by JON SUTH, on Flickr

    Painted the exhaust and polished the tips
    IMG_20231016_191547 by JON SUTH, on Flickr

    And all back on the car…. Now the exhaust came off easily because I’d previously replaced the hardware with stainless bolts and brass nuts, not the horribly corroding/dissolving steel that honda fit!
    IMG_20231016_200836 by JON SUTH, on Flickr

    Same on the cat shields
    IMG_20231016_200843 by JON SUTH, on Flickr

    And there we are, all back on, brakes bled, test driven, feels a whole lot tighter and planted, which it should, as it’s pretty much all new!
    Have a weird wide angle pic to end
    IMG_20231017_172652 by JON SUTH, on Flickr
    Last edited by britlude; 21-10-2023 at 10:15 AM.
    aka Jonathan!!

    '92 charlotte green auto.... as a daily
    '37 Ford Y street rod......... something for the weekend!

    ...... if a photobucket pic is foggy, click it, and it'll take you to the clear version, yes, it's a clicking faff....

  8. #8

    Default

    Who needs dry ice!!!! Awesome job. You are the clever.
    I am Godzilla, you are Japan!

  9. #9

    Default

    I am impressed that the sand blasting attachment for the pressure washer worked as well as it did. I have a big-ass air compressor with a pressure feed abrasive blaster; but, man does it make a mess. I will not use it for small clean up because of the effort (respirator and blast hood) and the clean up after use so it has not seen use in the last few years. Based upon your experience I might be tempted to try one of those pressure washer attachments just because you don't have to deal with the dust.

    Nicely done on the suspension rebuild.

  10. #10
    Join Date
    Apr 2004
    Location
    West Sussex
    Posts
    4,537

    Default

    Hi Jon, did you by any chance take any measurements of the replacement bottom ball joint? I bought some QH ones a few years back to do this job but have not got around to it yet. Just wanted to confirm I had the correct part - the QH ones were about £15 each!

Page 1 of 3 123 LastLast

Posting Permissions

  • You may not post new threads
  • You may not post replies
  • You may not post attachments
  • You may not edit your posts
  •