Today at Atelier Kaz - ex-Honda R&D, F1, Indy/CART engineer
Eng Refresh Stage 1 + LMA 19
by , 12-09-2012 at 10:43 PM (2949 Views)
Had to shut down myself for a while as I was not well and
slept continuously almost 12hours.....
I should have known better by now......
Counterproductive when keep working continuously for many weeks......
Now, Im back.
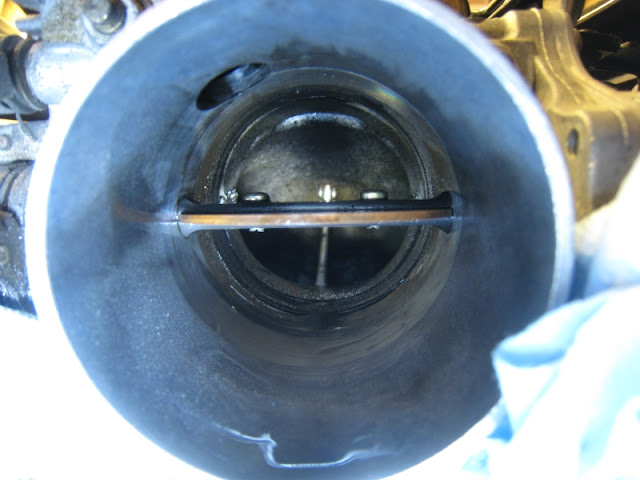
Before warming up the engine for compression check,
cleaned the very dirty TH butterfly and TH body.
It used to look like this.
As it was so dirty and noticed that someone already touched the
idle adjust screw in the past without washing the TH,
I may need to adjust the idle rpm after the test driving session.
Time for the compression check.
[psi]
#1: **6, #2: **7, #3: **6, #4: **5, #5: **2, #6: **3
After spending so many hours on this engine,
Im so happy with this result and its rewarding.
The owner has been informed about the full compression data
for before/after comparison.
As reported earlier in this post, all three cyl at the front bank were
showing quite low figures compared to the ones at the rear bank and
especially I was concerned about the #5 cyl.
In fact, I even carried out the leak down test because of that.
The cause of the low compression was poor valve adjustment especially
at the #5 cyl.
I couldnt even put 0.15mm guage on both the intake and exhaust sides.
Way too tight.
All six cyl are now very close each other and once again,it could have been just my ears,but the engine sounded so smooth.
Im happy.

The IG coils at #2 and #5 were repaired in the past.
Although there was no misfire, I already noticed some crack at
the flex tube just below the repaired section so added
extra material and also applied silicone grease at the
metal frame and flex tube.

New rubber seals at the IG coil covers.
Applied silicone grease to keep them healthy.
The strange looking bolts (lower side) used at the IG coil cover and
the proper replacement OEM ones (upper side).
I now know why someone used the wrong spec bolt.
The thread on the magnesium valve cover was already damaged and
couldnt get enough torque on two bolts at the front IG coil cover.
As I was not sure of using the helicoil on magnesium material,
decided to use liquid gasket on installation.
As two cap nuts at the centre and remaining two bolts at the side were fine,
the rubber gasket should make enough seal for a long time.
New air filter installed.
Nothing new for me.
Just fill the oil filter with fresh engine oil before installing it.
After draining the used oil from the sump,
used the suction pump to extract further 400cc from the top.
Fresh Mobil 1 in the engine, fired up, lift the car in the air and
gave good inspection from front to rear for any parts that I removed
during the engine refresh and cooling system overhaul.
Will adjust the oil level later.
So, pretty much everything done for the Engine Refresh apart from
resetting the ECU and possibly adjusting the idle rpm.
Will install the engine cover and tower bar stiffener later.
Finally, I can start working on the brake calipers.
By the way, while I was cleaning the engine bay after the engine removal,
I found the missing sticker from the engine fuse box.
Thinly applied liquid gasket and attached the label.
Push, push as I need to finish another NSX sitting next to me and then
another Engine Refresh on my MX-5.
More to follow later.
Kaz


Updated 24-09-2012 at 10:07 AM by Kaz-kzukNA1 (Revised blog category.)
Tags:
air cleaner element,
air filter,
compression check,
engine oil,
ig coil,
ig coil cover,
leak down test,
oil filter,
reset ecu,
th body,
th butterfly

- Categories
- Eng Refresh Stage 1 + LMA
 Email Blog Entry