


Today at Atelier Kaz - ex-Honda R&D, F1, Indy/CART engineer
Eng Refresh Stage 1 14
by , 15-12-2011 at 10:35 PM (2513 Views)
Installed new rubber seals to the TB Front and Rear covers.
In the past, if you order the WP, it automatically came with the new TB Lower cover and the small rubber grommet for the WP seepage tube. The price was the total of these three parts.
However, after the recent price revision, I found that I can make tiny saving by ordering these three parts separately in Japan. It will be interesting to see how it will change after the price revision next month.
So, the new TB lower cover with the grommet and the new rubber gasket installed ready for the TB installation.
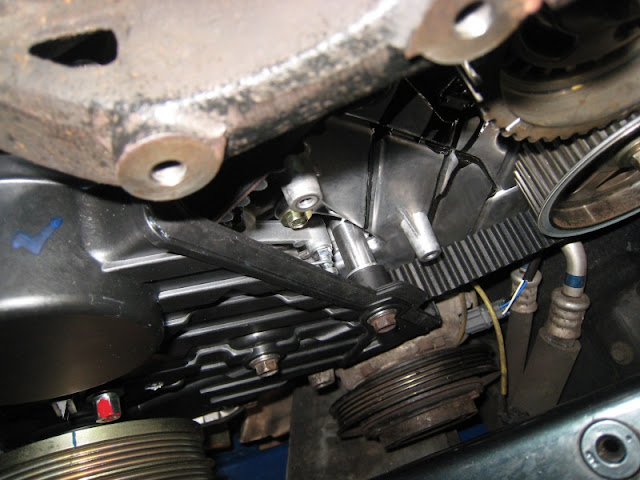
New TB installed, adjusted the tension (very important) and installed the TB lower cover.
As you can see, the two long bolts for the A/C idler pulley bracket were briefly installed at the cover for the alignment purpose. The one in the middle of the photo passing through the silver metal collar is the one initially cross-threaded by the previous service.
This time, it took extra time to install the TB. Normally, it just slides on after aligning each cam gears especially the rear bank exhaust one but today, due to the cold temperature, I couldnt move my fingers well.
Before going any further, as always, just check the timing of each cam gears against crank shaft again and again and again.
Happy with the result but decided to stop here as I wanted to be as fresh as possible before going through the delicate valve clearance adjustment.
From my past experience, it would be quicker to carry out these procedures while the engine was out of the chassis especially for the detailed cleaning process and the marathon valve clearance adjustment.
Hope to be able to take my engine out with the GBox and sub frame next month.
More to follow.
Kaz

Tags:
timing belt,
water pump

- Categories
- TB/WP/Valve Service
 Email Blog Entry


